• Skip to main content
  • Skip to after header navigation
  • Skip to site footer
Nordic kitchen stories logo

Nordic Kitchen stories

Inspired by family recipes

  • Home
  • Recipes
    • Baking
    • Breakfast
    • Brunch
    • Cakes
    • Desserts
    • Dinner
    • Drinks
    • Festive
    • Fika
    • Fish
    • Foraged Food
    • Gluten-Free
    • Healthy
    • Lunch
    • Main
    • Nordic
    • Pickling
    • Preserving
    • Salads
    • Sharing
    • Snacks
    • Soups
    • Sourdough Baking
    • Starters
    • Vegan
    • Vegetarian
  • Bespoke Cakes
  • Workshops
    • Sourdough Workshops
    • Nordic Baking Workshop
    • Pastry – Savoury Tarts
  • Work with me
  • Buy my book
  • About

Elderberry Poached Pears

3rd September 2020 by Louise
Elderberry Poached Pears

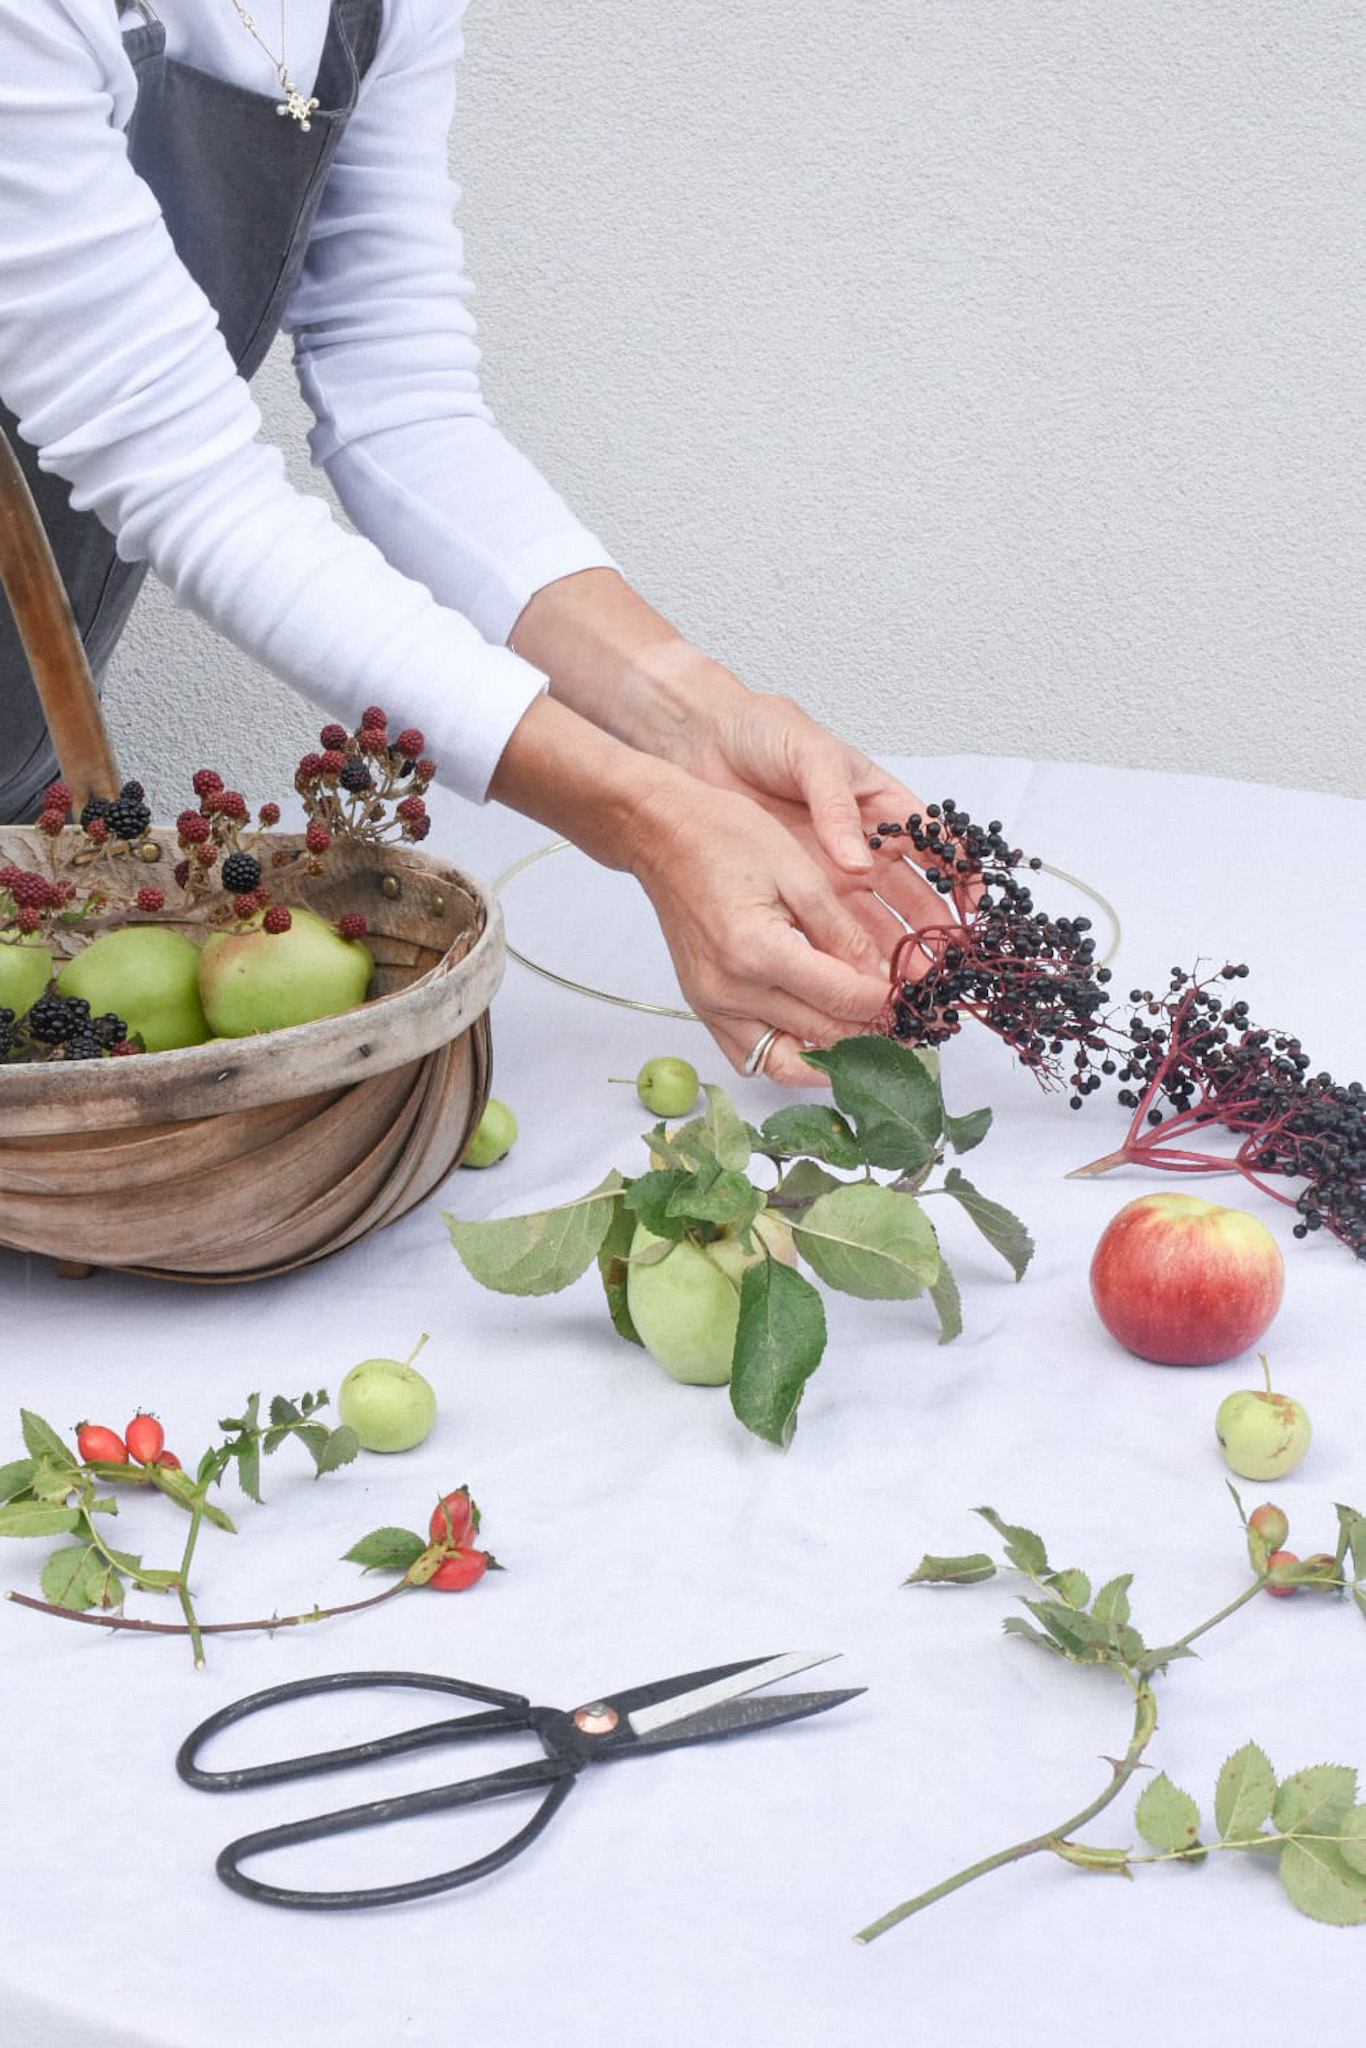
I love to forage as autumn arrives, it’s not just about finding free food, I feel a real connection with nature.

Our ancestors foraged for almost all of their food, but this fell by the way side with the agricultural revolution.  However in the last decade, foraging has made a big comeback.  No longer a passing foodie trend, with a steady rise in foraging experts and courses in the UK to participate in.

What were once fragrant creamy-white clusters in spring are now deep magenta berries.  It’s hard to believe they’re the same plant.  If you take yourself on a walk in the countryside, you’re bound to stumble across elderberries.  Elderberries are packed with antioxidants and vitamins, that boost your immune system.  They can also help to reduce stress, which, let’s face it, we all suffer with on occasion. So all in all, nature does its bit to look after us!

Elderberries, growing wild


Foraged Fruit
Foraged Fruit (Photo by Marta Wasielewska)

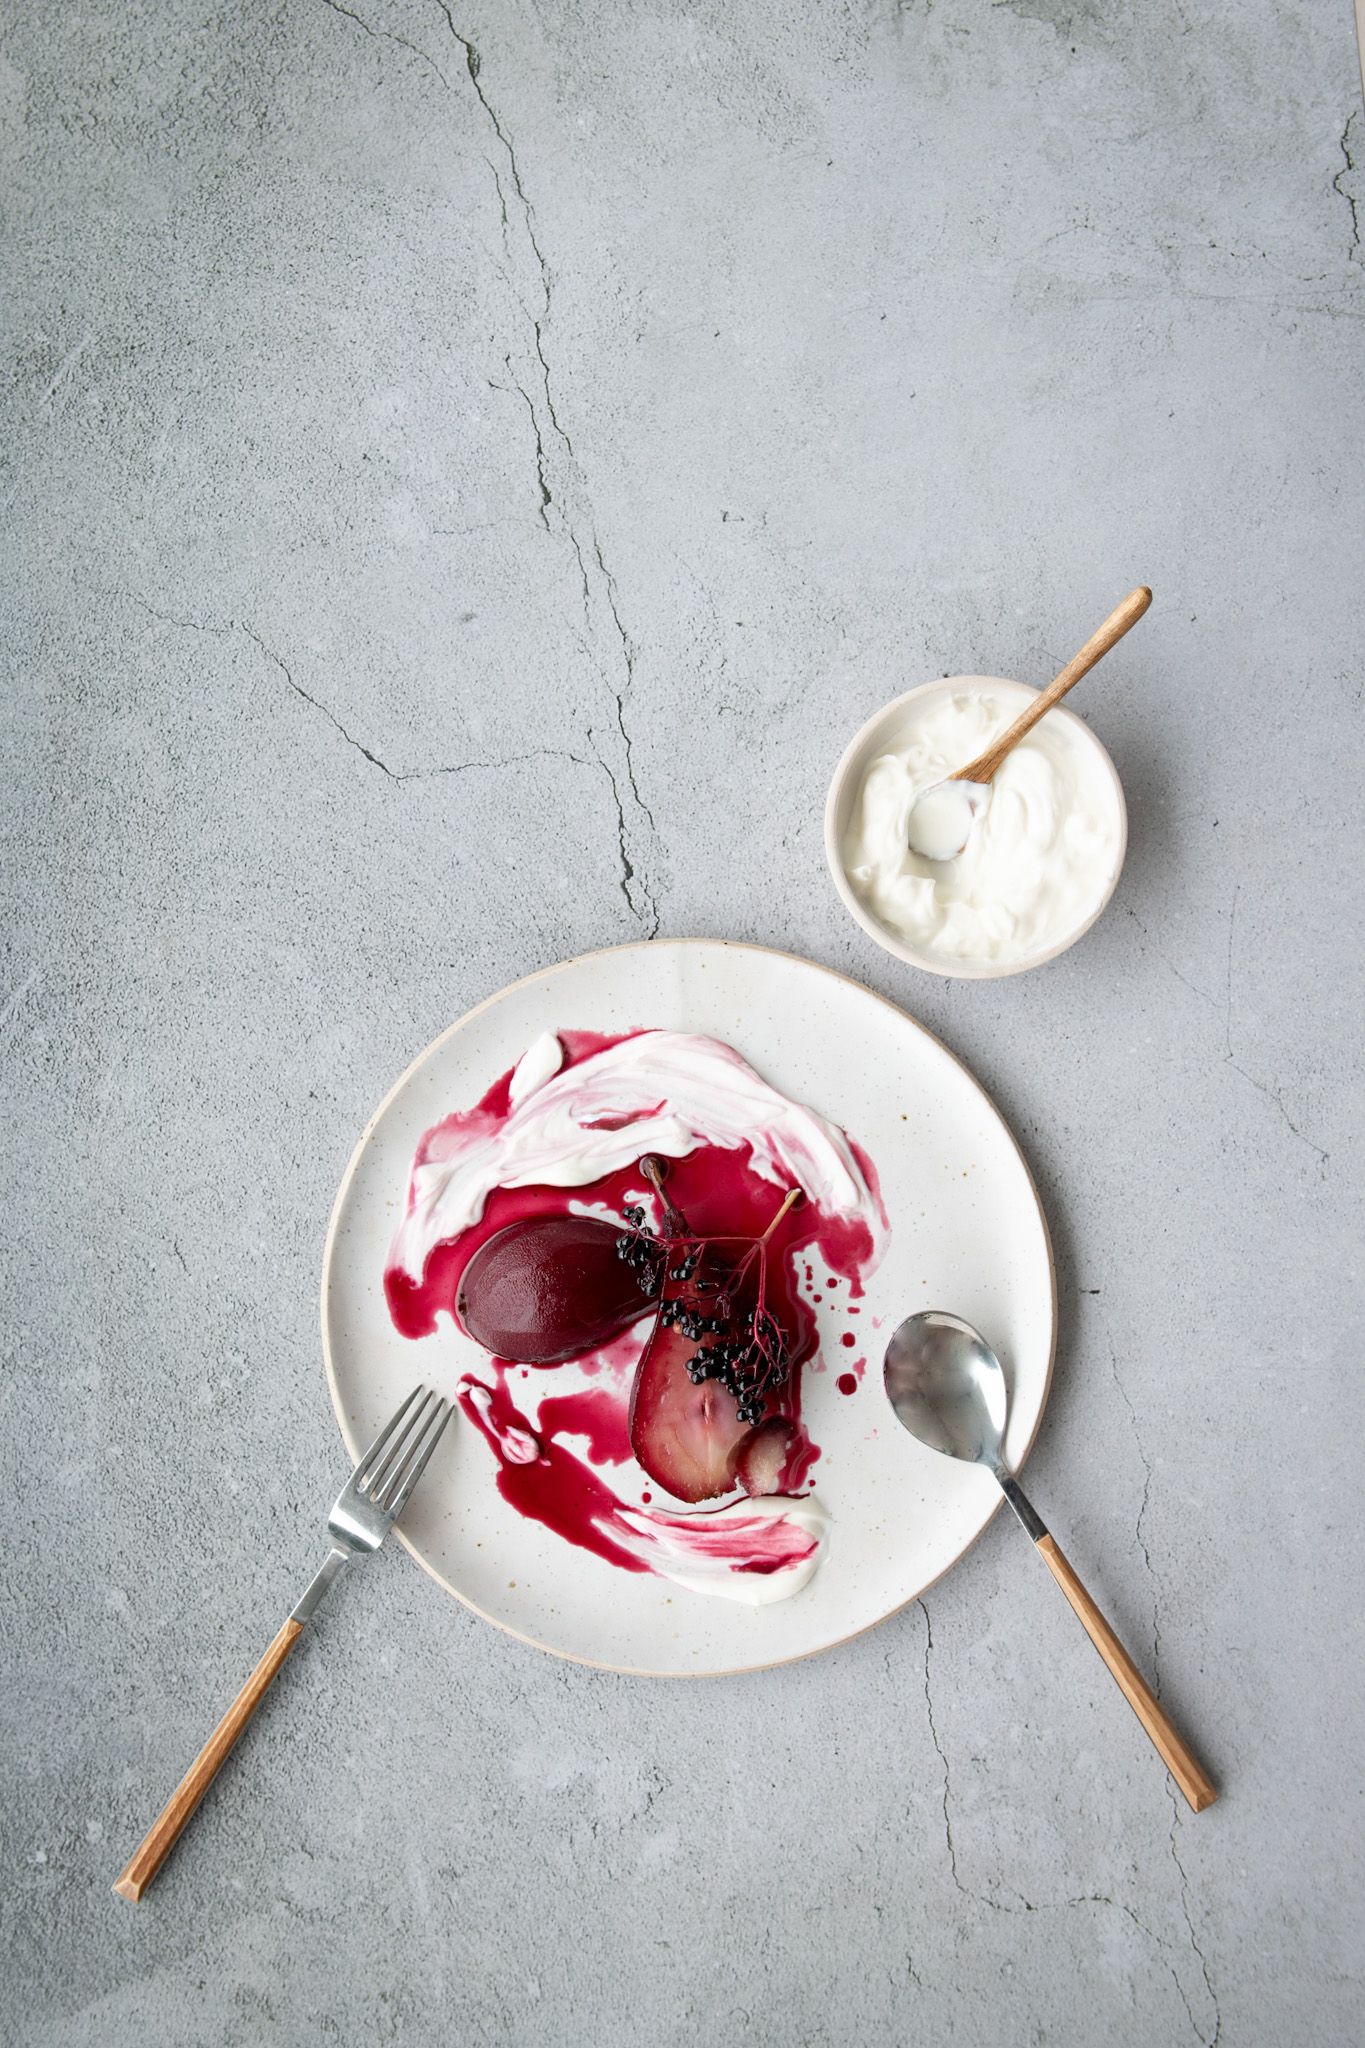
This uncomplicated dessert is so simple to make, yet it looks so impressive.  It can easily be prepared ahead and served either warm or cold.

If you like this recipe, you may like to try Spiced preserved pears.

Elderberry Poached Pears
Print Recipe

Elderberry Poached Pears

Prep Time30 minutes mins
Cook Time25 minutes mins
Total Time55 minutes mins
Course: Dessert
Servings: 4 people

Ingredients

  • approximately 12 elderberry heads ripe
  • 4 conference pears not too ripe
  • 190 g golden caster sugar
  • 2 bay leaves
  • 5 cloves
  • 1 lemon pared zest, juice of half
  • Thick Greek style yogurt or creme fraiche to serve

Instructions

  • Carefully peel the pears, leaving the stalks intact. Have a medium pan ready and add the sugar, 1/2 litre of water, the pared zest of a lemon and juice, the bay leaves and the cloves. Now wash the elderberry heads, leaving four smallish heads to serve with the pears. With the remainder using a fork, remove the berries from the stalks straight into the saucepan. Bring to a slow simmer and using a wooden spoon squash the berries to release the juice. simmer for several minutes.
  • Now add the pears and simmer for 20-25 minutes, rotate the pears every 5-7 minutes to ensure they poach evenly on all sides, including the tops of the pears.  They're ready when a knife yields easily when inserted into the pear. Remove the saucepan from the heat and allow the pears to cool down in the poaching syrup. (the longer the pears sit in the syrup after poaching, the better they’ll taste). When the pears are cool enough remove, strain the syrup and pour back into the pan. Reduce by one third.
  • When you’re ready to serve place a large frying pan on the hob, add approximately 6 tablespoons of the syrup to the pan on a medium high heat. Add the remaining elderberry heads and let them cook for several minutes or until the start to burst. Remove from the heat.
  • Cut the pears in half, or serve whole upright, drizzle the syrup on the plates and add the elderberry heads. Serve with the yogurt or creme fraiche.
  • The remaining syrup can be diluted with sparkling water as a refreshing, immune boosting drink.

Notes

*I have used the elderberry heads as a garnish only, they are not for consumption.

Tips:

  • The longer you leave the pears in the syrup, the darker they’ll become.  If you just want a hint of colour, remove them from the syrup as soon as they are cooked.
  • Add sliced fresh ginger and or cinnamon to the syrup for added flavour.


Share this:

  • Click to print (Opens in new window) Print
  • Click to share on Facebook (Opens in new window) Facebook
  • Click to share on X (Opens in new window) X
  • Click to share on Pinterest (Opens in new window) Pinterest
  • Click to email a link to a friend (Opens in new window) Email
Category: Autumn, Desserts, Foraged Food, Gluten-Free, Healthy, VegetarianTag: dessert, healthy, simple
Previous Post:Beetroot Carpaccio, Pickled Blackberries, Halloumi & GranolaBeetroot Carpaccio, Pickled Blackberries, Halloumi & Granola
Next Post:Elderberry & Pear Frangipane TartElderberry & Pear Frangipane Tart

Reader Interactions

Comments

  1. Tasha

    4th September 2025 at 9:13 pm

    Hi,

    I had a question about garnishing these pears with the raw elderberries at the end. Aren’t they mildly toxic when uncooked?

    I’m actually planning to make your elderberry & pear frangipane tart which looks incredible. I was just reading through the poaching method when i spotted this and was curious.

    Reply
    • Louise

      5th September 2025 at 8:23 am

      Hi Tasha,
      The elderberries are purely a garnish, and not for consumption. I will make that clear in the recipe. I hope you like the pear and frangipane tart.

      Reply

Leave a Reply Cancel reply

Your email address will not be published. Required fields are marked *

Recipe Rating


A Spanish tortilla of sorts 🍳 Gorgeous rainbow ch A Spanish tortilla of sorts 🍳

Gorgeous rainbow chard and a good grating of hard cheese makes this anything but traditional.

The key is taking your time with the potatoes and onion, frying them low and slow in a generous amount of olive oil for at least 25 minutes before the chard and garlic go in. Don’t rush it.

I used 7 eggs but on reflection 8 or 9 would’ve been better for my pan. 

Perfect for weekend brunch or a proper sit-down lunch, I love it with quick pickled red cabbage and a green salad. Simple, colourful and so good.

#spanishtortilla #tortilla #rainbowchard #hardcheese #weekendeggs
New dates added for April and May. Tap on the link New dates added for April and May. Tap on the link in my profile for more information.

#workshop #buckinghamshire #sourdough baking #learnsomethingnew
I’d almost forgotten how satisfying it is to make I’d almost forgotten how satisfying it is to make your own yogurt. A surplus of milk from the milkman this week gave me just the reason I needed to get back into it.

One of the simplest things to make. All you need is 1 litre of whole milk, (semi-skimmed will work but whole milk gives you a thicker and creamy yogurt) 1 tablespoon of skimmed milk powder, and 2 tablespoons of live yogurt to get things going.

Heat your milk to 85°C, let it cool down to 40-45°C, stir in the yogurt, pour into sterilised jars and keep it at that same temperature if you can for 6-8 hours.

If you’d like Greek style yogurt, just strain through a muslin.

#homemadeyogurt #yogurtmaking #fromscratch #milkman #greekyogurt
Still firmly in comfort food territory over here. Still firmly in comfort food territory over here. Yes, I’ve spotted the tiniest hints of spring, the hawthorn has just started to blossom, which honestly feels like a miracle, and almost a full day of sun yesterday! But I’m still craving something warm and satisfying.

So tonight roasted organic chicken thighs, sitting on a creamy white bean purée, onion and garlic sautéed until soft, then blended until silky and rich. Then I remembered I had a sad little bunch of cavolo nero lurking in the fridge, so I blanched and blitzed it into the most gorgeous dark green pesto with garlic, cashew nuts, EVOO, Parmesan and a bright little spritz of lemon.
Finished the whole thing off with crispy rosemary and a few quick pickled red onions on top…because honestly, is there anything better than crispy rosemary and that little hit of acidity to cut through it all?
Nourishing and indulgent at the same time.​​​​​​​​​​​​​​​​

#ComfortFood #chickenthighs #WhiteBeanPuree #cavolonero #kalepesto
Seared Hake with braised Fennel, Olives, and Citru Seared Hake with braised Fennel, Olives, and Citrus.

I’ve been craving brighter, zingy flavours lately, the kind that wake up your tastebuds and remind you that winter doesn’t have to be all heavy and rich. 
There’s something about the delicate, flaky texture of hake that pairs perfectly with bright Mediterranean flavours.

Seared Hake with Braised Fennel & Citrus
Serves 2
	∙	2 hake fillets
	∙	2-3 fennel bulbs, cut into 6
	∙	1 leek, finely sliced
	∙	½ small blood orange, juiced
	∙	1 small lemon
	∙	5 green olives, quartered
	∙	1 tbsp capers
	∙	6 tbsp extra virgin olive oil
	∙	120ml white wine or stock
	∙	2 garlic cloves, sliced
	∙	a good pinch Aleppo pepper
	∙	Salt and pepper
	∙	Fresh herbs (optional)

1. Sear the fennel in batches in a shallow pan with 2 tbsp olive oil over medium heat. Then return to the pan with the leek, and garlic, season with salt (you can add a tsp of flour if you like a slightly thickened sauce). Cook 3-4 minutes, add wine/stock and juice of half a lemon, cover and braise 15-20 minutes, until tender.

2. Zest a little of the orange & lemon into a bowl. Add the blood orange juice, lemon juice, 3 tbsp extra virgin olive oil, Aleppo pepper, and a pinch of salt & whisk.

3. Pat hake dry, season with salt and pepper. Heat remaining oil in a cast iron pan over medium-high heat. Sear for 3-4 minutes, flip and cook for 2 more minutes or until just cooked through.

4. Add the olives & capers to the fennel and leek. Serve, top with hake, drizzle generously with the citrus-Aleppo dressing. Finish with fresh herbs.​​​​​​​​​​​​​​​​

#hake #fennel #citrusseason #dinnertonight #fishrecipe
I thought it high time I shared these beauties. It I thought it high time I shared these beauties. It’s that time of year again - Semlor Season. I’ve been making these fluffy cardamom buns filled with almond paste and crowned with whipped cream, and thought I’d share. 
The only tweak I’ve made to the recipe in my book? (P135) A pinch of Maldon salt in the filling, which really lifts the almond flavour. Trust me on this one. 

#semlor #semla #cardamombuns #almondfilling
Nordic kitchen stories logo

Sign up to receive my latest recipes by email

Copyright © 2026 · Louise Hurst · Privacy Policy · All Rights Reserved · Website by Callia Web