• Skip to main content
  • Skip to after header navigation
  • Skip to site footer
Nordic kitchen stories logo

Nordic Kitchen stories

Inspired by family recipes

  • Home
  • Recipes
    • Baking
    • Breakfast
    • Brunch
    • Cakes
    • Desserts
    • Dinner
    • Drinks
    • Festive
    • Fika
    • Fish
    • Foraged Food
    • Gluten-Free
    • Healthy
    • Lunch
    • Main
    • Nordic
    • Pickling
    • Preserving
    • Salads
    • Sharing
    • Snacks
    • Soups
    • Sourdough Baking
    • Starters
    • Vegan
    • Vegetarian
  • Bespoke Cakes
  • Workshops
    • Sourdough Workshops
    • Nordic Baking Workshop
    • Pastry – Savoury Tarts
  • Work with me
  • Buy my book
  • About

Prinsesstårta

27th June 2019 by Louise
Prinsesstarta Princess Cake
Prinsesstårta

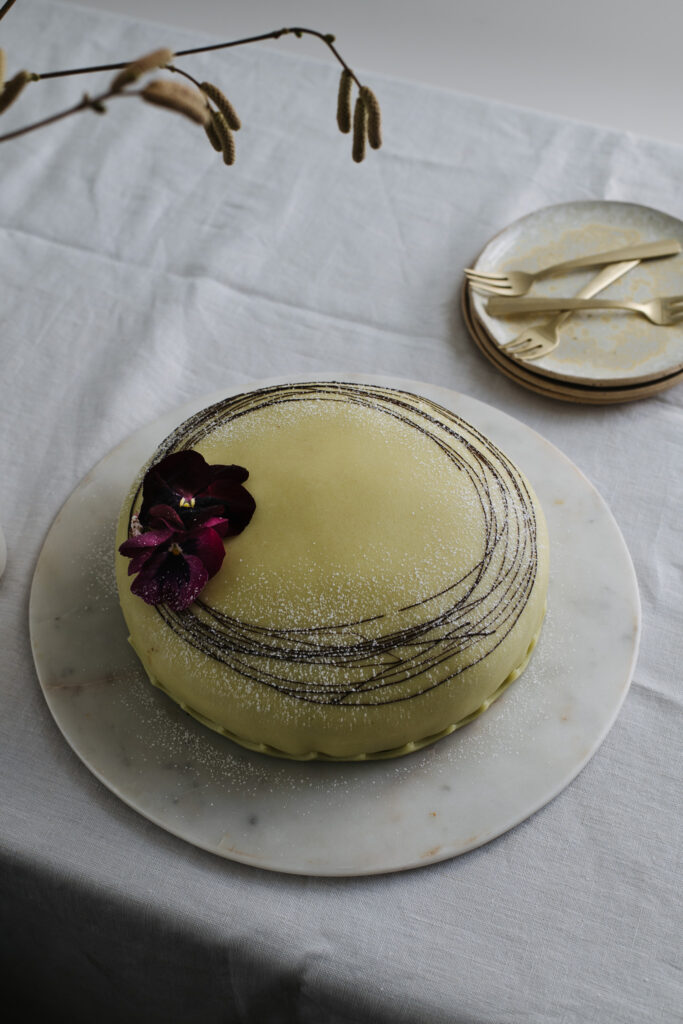
Quite simply the loveliest and most popular celebration cake in Sweden.

Let me explain, this is Prinsesstårta or Princess cake, so called because Princesses Margaretha, Märtha, and Astrid, daughters of Prince Carl, brother of King Gustaf V loved it so. And they weren’t alone. It promptly became popular in Sweden and Finland. Every year around 500,000 prinsesstårtor are sold in Sweden. Jenny Åkerström, home economist at the beginning of the 20th century created the cake. Originally named Grön Tårta (green cake) it certainly has a more appealing name now.

Consisting of a feather-light sponge layered with jam, crème pâtissière and masked in whipped cream and then encased in marzipan. I’m not a fan of marzipan when it contains almond extract, so if time permits, I prefer to make my own using one of the many recipes available online.

Genoise sponge

Cut the sponge into three even layers once it has cooled to room temperature.

Start by spreading raspberry jam over the bottom sponge layer, then place the middle layer on top. Next, evenly spread the crème pâtissière over it. Add the final sponge layer and coat the entire cake with whipped cream, shaping it into a smooth dome on top.

cream covered sponge

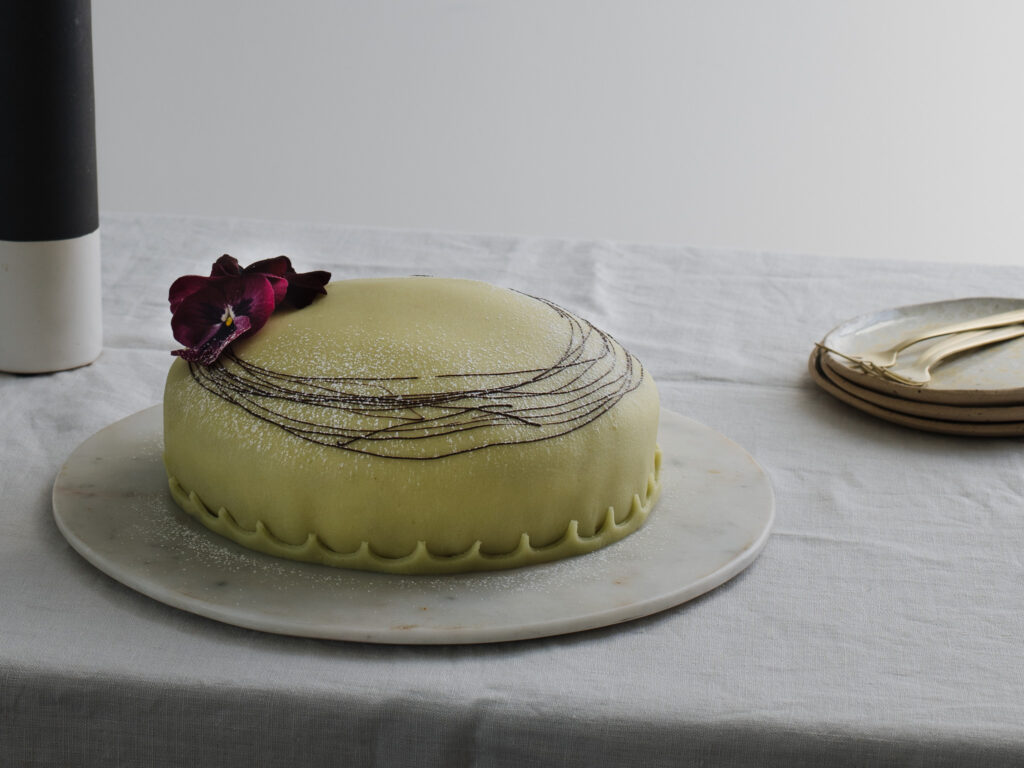
Use a small, sharp knife to trim the excess marzipan at the bottom for a clean edge. If this proves challenging, roll out any remaining marzipan and create a band to place around the bottom.

DID YOU MAKE THIS RECIPE FOR Prinsesstårta?

I’d love to hear how it turned out! Let me know in the comments below, or share a photo on Instagram and tag @nordickitchenstories.


Print Recipe

Prinsesstårta

The most popular celebration cake in Sweden. Prinsesstårta is a super light cake, layered with jam, crème pâtissière and cream, encased in marzipan.
Prep Time1 hour hr 50 minutes mins
Cook Time45 minutes mins
Total Time2 hours hrs 35 minutes mins
Course: Dessert
Cuisine: Scandinavian
Keyword: cake,, Swedish,
Servings: 6 people

Equipment

  • 20cm deep cake tin

Ingredients

  • 4 large free-range eggs
  • 110 g golden castor sugar
  • 100 g plain flour all purpose + extra for dusting
  • 55 g butter melted, cool to room temperature

Crème pâtissière

  • 250 g full-fat milk
  • 30 g golden castor sugar
  • 15 g cornflour
  • 3 large free-range egg yolks
  • 15 g unsalted butter
  • 1 teaspoon vanilla extract

To Assemble with

  • 400 g marzipan white
  • natural green food colouring
  • 400 ml double cream
  • 150 g good-quality raspberry jam
  • 50 g raspberries fresh or frozen

To decorate

  • melted dark chocolate
  • icing sugar
  • edible flowers

Instructions

  • Pre-heat the oven to 160°C(fan). Line a 20 cm deep cake tin with parchment paper and grease the sides with butter, then dust with plain (all purpose) flour. Shake off the excess.
  • Sift the flour and to set one side. Melt the butter in a small saucepan, pour into a medium bowl and set to one side to cool to room temperature.
  • In a free-standing mixer with a whisk attachment, beat the eggs and sugar on a high speed until you reach ribbon stage. This will take a good 5 minutes, set a timer as this is crucial because there is no raising agent in this cake.
  • Pour half of the flour over the egg mixture and then, this is important, use a balloon whisk to fold it in, repeat with the remaining flour. Now whisk approximately 3 tablespoons of the cake batter into the butter, this really helps to incorporate the butter into the batter. Now whisk in an additional tablespoon of batter into the butter mixture. Fold the butter mixture into the batter with a spatular until it’s just combined. Don't over mix or you'll knock the volume out of the cake.
  • Pour into the prepared tin and bake for 30-32 minutes or until a cocktail stick inserted into the centre of the cake comes out clean. (The sponge will shrink away from the tin when it's fully baked).
  • Now for the crème pâtissière, in a large bowl whisk the egg yolks, sugar, vanilla extract and cornflour together until pale and creamy. Pour the milk into a pan and place over a medium-low heat until just simmering. Whisk the warm milk into the egg mixture. Pour the mixture back into the pan and cook over medium heat for 4-5 minutes, whisking until the mixture boils and thickens.
  • Remove from the heat and beating the butter into a the mixture and then transfer to a bowl and cover the surface with a disc of parchment to stop a skin forming. Chill in the fridge until needed.
  • Combine the jam with the fresh or frozen raspberries and set to one side.
  • To assemble: with a serrated knife, cut the cake horizontally into three layers. Spoon the jam mixture onto the bottom layer of the cake now place the middle layer of the sponge on top. Remove the the creme patisserie from the fridge and whisk vigorously until smooth. Spoon this onto the middle layer of the cake. Now place the final layer of sponge on top of the crème pâtissière. Whip the cream until stiff peaks form. Spread a generous layer on top of the cake using a palette knife and cover the cake with a thinner layer around the edges. Place the cake in the fridge to set while you roll out the marzipan.
  • Now to colour the Marzipan, I have used a natural food colouring here. Just add a little to a small amount of marzipan, kneading it in to distribute the colour, then add this to the uncoloured marzipan, you have to work at distributing the colour and it takes a little time. once this is done roll the marzipan out until it’s at least a third bigger than the cake.
  • Place the marzipan disc on the cake and gently cup your hands around it to shape it smoothly over the sides. Use a small, sharp knife to trim the excess at the bottom for a clean edge. If this proves challenging, roll out any remaining marzipan and create a band to place around the bottom.
  • To decorate: pipe with dark chocolate, and dust with icing sugar and finish with an edible flower or two.

Share this:

  • Click to print (Opens in new window) Print
  • Click to share on Facebook (Opens in new window) Facebook
  • Click to share on X (Opens in new window) X
  • Click to share on Pinterest (Opens in new window) Pinterest
  • Click to email a link to a friend (Opens in new window) Email
Category: Autumn, Baking, Cakes, Desserts, Fika, Nordic, Spring, Summer, WinterTag: cake, Celebration cake, nordic, scandinavian
Previous Post:Tomato and Mascarpone Tart,Tomato & Mascarpone Tart
Next Post:Danish Stenalder Brød (Seed & Nut Loaf)Stenalderbrod

Reader Interactions

Leave a Reply Cancel reply

Your email address will not be published. Required fields are marked *

Recipe Rating


A Spanish tortilla of sorts 🍳 Gorgeous rainbow ch A Spanish tortilla of sorts 🍳

Gorgeous rainbow chard and a good grating of hard cheese makes this anything but traditional.

The key is taking your time with the potatoes and onion, frying them low and slow in a generous amount of olive oil for at least 25 minutes before the chard and garlic go in. Don’t rush it.

I used 7 eggs but on reflection 8 or 9 would’ve been better for my pan. 

Perfect for weekend brunch or a proper sit-down lunch, I love it with quick pickled red cabbage and a green salad. Simple, colourful and so good.

#spanishtortilla #tortilla #rainbowchard #hardcheese #weekendeggs
New dates added for April and May. Tap on the link New dates added for April and May. Tap on the link in my profile for more information.

#workshop #buckinghamshire #sourdough baking #learnsomethingnew
I’d almost forgotten how satisfying it is to make I’d almost forgotten how satisfying it is to make your own yogurt. A surplus of milk from the milkman this week gave me just the reason I needed to get back into it.

One of the simplest things to make. All you need is 1 litre of whole milk, (semi-skimmed will work but whole milk gives you a thicker and creamy yogurt) 1 tablespoon of skimmed milk powder, and 2 tablespoons of live yogurt to get things going.

Heat your milk to 85°C, let it cool down to 40-45°C, stir in the yogurt, pour into sterilised jars and keep it at that same temperature if you can for 6-8 hours.

If you’d like Greek style yogurt, just strain through a muslin.

#homemadeyogurt #yogurtmaking #fromscratch #milkman #greekyogurt
Still firmly in comfort food territory over here. Still firmly in comfort food territory over here. Yes, I’ve spotted the tiniest hints of spring, the hawthorn has just started to blossom, which honestly feels like a miracle, and almost a full day of sun yesterday! But I’m still craving something warm and satisfying.

So tonight roasted organic chicken thighs, sitting on a creamy white bean purée, onion and garlic sautéed until soft, then blended until silky and rich. Then I remembered I had a sad little bunch of cavolo nero lurking in the fridge, so I blanched and blitzed it into the most gorgeous dark green pesto with garlic, cashew nuts, EVOO, Parmesan and a bright little spritz of lemon.
Finished the whole thing off with crispy rosemary and a few quick pickled red onions on top…because honestly, is there anything better than crispy rosemary and that little hit of acidity to cut through it all?
Nourishing and indulgent at the same time.​​​​​​​​​​​​​​​​

#ComfortFood #chickenthighs #WhiteBeanPuree #cavolonero #kalepesto
Seared Hake with braised Fennel, Olives, and Citru Seared Hake with braised Fennel, Olives, and Citrus.

I’ve been craving brighter, zingy flavours lately, the kind that wake up your tastebuds and remind you that winter doesn’t have to be all heavy and rich. 
There’s something about the delicate, flaky texture of hake that pairs perfectly with bright Mediterranean flavours.

Seared Hake with Braised Fennel & Citrus
Serves 2
	∙	2 hake fillets
	∙	2-3 fennel bulbs, cut into 6
	∙	1 leek, finely sliced
	∙	½ small blood orange, juiced
	∙	1 small lemon
	∙	5 green olives, quartered
	∙	1 tbsp capers
	∙	6 tbsp extra virgin olive oil
	∙	120ml white wine or stock
	∙	2 garlic cloves, sliced
	∙	a good pinch Aleppo pepper
	∙	Salt and pepper
	∙	Fresh herbs (optional)

1. Sear the fennel in batches in a shallow pan with 2 tbsp olive oil over medium heat. Then return to the pan with the leek, and garlic, season with salt (you can add a tsp of flour if you like a slightly thickened sauce). Cook 3-4 minutes, add wine/stock and juice of half a lemon, cover and braise 15-20 minutes, until tender.

2. Zest a little of the orange & lemon into a bowl. Add the blood orange juice, lemon juice, 3 tbsp extra virgin olive oil, Aleppo pepper, and a pinch of salt & whisk.

3. Pat hake dry, season with salt and pepper. Heat remaining oil in a cast iron pan over medium-high heat. Sear for 3-4 minutes, flip and cook for 2 more minutes or until just cooked through.

4. Add the olives & capers to the fennel and leek. Serve, top with hake, drizzle generously with the citrus-Aleppo dressing. Finish with fresh herbs.​​​​​​​​​​​​​​​​

#hake #fennel #citrusseason #dinnertonight #fishrecipe
I thought it high time I shared these beauties. It I thought it high time I shared these beauties. It’s that time of year again - Semlor Season. I’ve been making these fluffy cardamom buns filled with almond paste and crowned with whipped cream, and thought I’d share. 
The only tweak I’ve made to the recipe in my book? (P135) A pinch of Maldon salt in the filling, which really lifts the almond flavour. Trust me on this one. 

#semlor #semla #cardamombuns #almondfilling
Nordic kitchen stories logo

Sign up to receive my latest recipes by email

Copyright © 2026 · Louise Hurst · Privacy Policy · All Rights Reserved · Website by Callia Web