• Skip to main content
  • Skip to after header navigation
  • Skip to site footer
Nordic kitchen stories logo

Nordic Kitchen stories

Inspired by family recipes

  • Home
  • Recipes
    • Baking
    • Breakfast
    • Brunch
    • Cakes
    • Desserts
    • Dinner
    • Drinks
    • Festive
    • Fika
    • Fish
    • Foraged Food
    • Gluten-Free
    • Healthy
    • Lunch
    • Main
    • Nordic
    • Pickling
    • Preserving
    • Salads
    • Sharing
    • Snacks
    • Soups
    • Sourdough Baking
    • Starters
    • Vegan
    • Vegetarian
  • Bespoke Cakes
  • Workshops
    • Sourdough Workshops
    • Nordic Baking Workshop
    • Pastry – Savoury Tarts
  • Work with me
  • Buy my book
  • About

Fermented Vegetables – A Guide

16th October 2023 by Louise
Fermented Vegetables - A Guide
Fermented Vegetables – Day 1

Fermented foods are the unsung heroes of the gut, giving our intestines a standing ovation-worthy performance. You see, these foods are packed with probiotics – those friendly microorganisms that turn your digestive system into a well-oiled machine. Probiotics are like the peacekeepers in your gut, ensuring that everything runs smoothly and that harmful invaders ( bad bacteria) are kept in check. In this blog post, I will explain how to Ferment Vegetables, offering a step-by-step guide for beginners.

Lacto-fermentation is an age-old food preservation technique that not only extends the shelf life of vegetables but also enhances their flavour and nutritional value. Unlike canning or pickling, which rely on heat and vinegar, lacto-fermentation uses naturally occurring beneficial bacteria to create a tangy, probiotic-rich product.

What is Lacto-Fermentation?

Lacto-fermentation is a simple and ancient method of preserving vegetables through fermentation. The name comes from Lactobacillus, a group of beneficial bacteria that convert sugars into lactic acid. This process not only preserves the vegetables but also adds a unique tangy flavour and introduces beneficial probiotics to your diet.

Here’s a step-by-step guide on how to lacto-ferment vegetables at home:

Ingredients and Equipment

Before you start fermenting, gather the necessary ingredients and equipment:

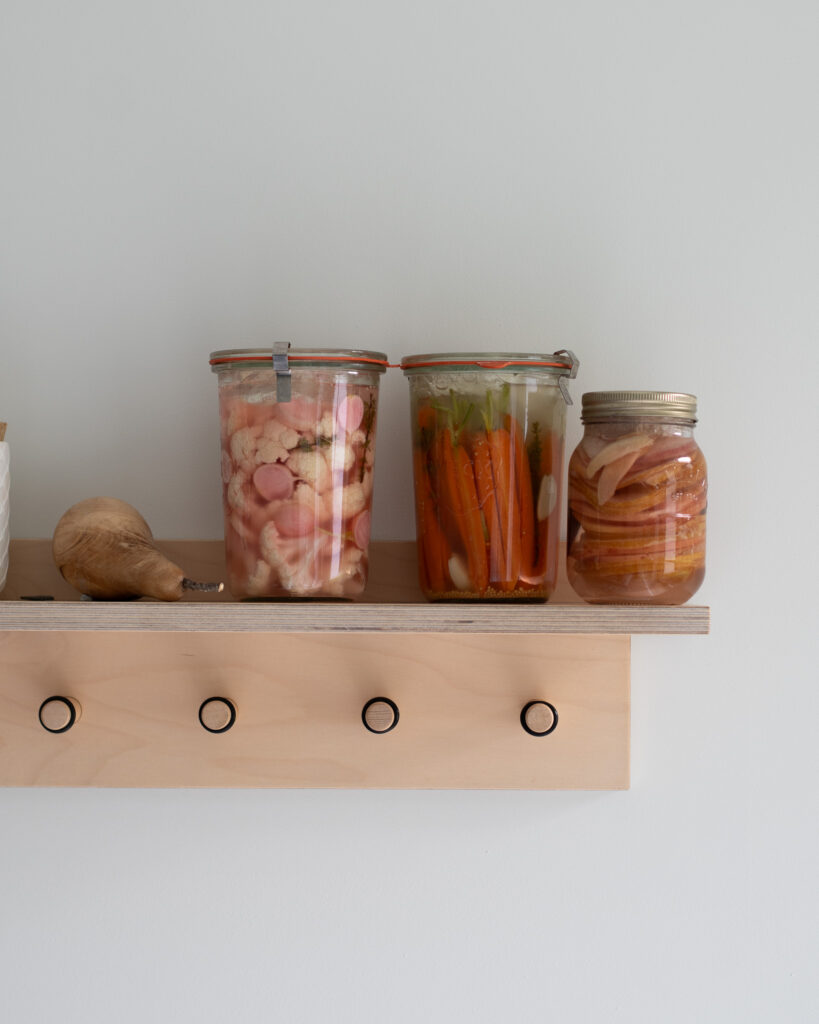
Fresh Vegetables: You can ferment a wide variety of vegetables, such as cabbage, green tomatoes, cauliflower, carrots, radish, peppers, and more. Pears and apples work well too.

Salt: Use high-quality, non-iodised salt like fine sea salt. The salt helps control the fermentation process and inhibits the growth of harmful bacteria.

Filtered Water: Chlorinated tap water can interfere with the fermentation process, so use filtered or cooled water from the kettle.

Spices and Herbs: optional: add spices and herbs for flavour. Common choices include garlic, ginger, dill, or chili flakes. Be sparing though, the flavour intensifies.

A Glass kilner Jar: Use a clean, glass jar with a hinged lid. The size of the jar should depend on the amount of vegetables you wish to ferment.

Add the Brine:

This is a very simple method for preparing the brine; place the vegetables in an appropriate sized jar. Pour the water into the jar, almost to the top. Now place a bowl on the scales and weigh the water from the jar in grams. Once you have a figure you can calculate the salt. You will need 2% of the total weight of the water. For example:

360g water x 2% Salt = 7.2g Salt (use 7g)

Stir the water with a wooden spoon to dissolve the salt, then pour the brine on the vegetables in the jar. Leave about 2.5cm of space at the top of the jar to allow for expansion during fermentation.

Weight and Seal:

Place a glass weight (or a food-safe plastic bag filled with water No metal) on top of the vegetables to keep them submerged. This is important to prevent unwanted bacteria ie. mould. Remove the rubber gasket, seal the jar with the lid.

Fermented Vegetables - Day 4

Fermentation Time

Store the jars at room temperature, away from direct sunlight. The lacto-fermentation process will take a minimum of 4 days and up to several weeks, depending on factors like temperature and the type of vegetable.

This is DAY 4 of fermentation. The brine has become cloudy and there are signs of CO2. From this day forward check the vegetables daily for the desired level of tanginess. Move to the fridge to slow down the fermentation process when you’re happy with the taste. . I like my vegetables to ferment for 7-10 days. Consume within approximately 1 month.

When you have the desired flavour for your fermented vegetables they can be used as a tasty condiment, side dish, or snack. Incorporate them into salads, sandwiches, or simply enjoy them on their own.

Health Benefits of Lacto-Fermented Vegetables

Lacto-fermented vegetables offer numerous health benefits:

Probiotics: The fermentation process introduces beneficial bacteria into the vegetables, which can promote gut health and boost your immune system.

Nutrient Retention: Lacto-fermentation preserves the nutritional value of vegetables, including vitamins and minerals.

Improved Digestion: The enzymes produced during fermentation can aid in the digestion of other foods.

In conclusion, lacto-fermentation is a fantastic way to preserve the harvest and unlock a world of flavour and nutrition. Whether you’re new to food preservation or a seasoned enthusiast, have a go at fermenting vegetables and savour the delicious, probiotic-rich results of this ancient technique. It’s a simple and rewarding process that brings you closer to your food and its preservation. Happy fermenting!

Did you make this?

I would love to know if you tried this method of fermentation. Please let me know by commenting below. Or you could snap a photo and share and tag it on Instagram @nordickitchenstories.

Share this:

  • Click to print (Opens in new window) Print
  • Click to share on Facebook (Opens in new window) Facebook
  • Click to share on X (Opens in new window) X
  • Click to share on Pinterest (Opens in new window) Pinterest
  • Click to email a link to a friend (Opens in new window) Email
Category: Autumn, Gluten-Free, Healthy, Lunch, Nordic, Preserving, Summer, Vegan, VegetarianTag: guthealth, healthy, probiotic, vegetables
Previous Post:Roasted Tomato Galette
Next Post:Cod, Coconut, Basil and Lemongrass

Reader Interactions

Comments

  1. Therese

    1st August 2024 at 11:09 am

    when fermenting do you want a tight seal or room for airflow. your instructions said to remove the rubber ring….

    Reply
    • Louise

      1st August 2024 at 1:54 pm

      Hi Therese, by adding a weight or a bag filled with with water will prevent any unwanted bad bacteria and airflow. Removing the rubber seal will allow any gasses that build to dissipate. You can leave it on the jar but you’ll have to remember to open the jar every now and again to release the gas build up. This is called ‘burping’. Hope this helps.

      Reply

Leave a Reply Cancel reply

Your email address will not be published. Required fields are marked *

Recipe Rating


Last week was a busy one — I’ve been making th Last week was a busy one — I’ve been making the most of the wild mushrooms while they’re still around.

1. Buttery sautéed chanterelles with poached egg and sourdough crumbs
2. A blackberry and bay celebration cake — I adore these autumn flavours
3. Incredible seasonal colours
4. A coconut and raspberry cake
5. And a warming wild mushroom soup

I finished the week on such a happy note — a lovely Friday morning teaching how to make sourdough. 

How did your week go?

#seasonaleating #autumnkitchen #wildmushrooms #sourdoughlove #foodwriter #bakingjoy #celebrationcake #foragedflavours #autumnvibes #homecooking #slowfood #nordickitchenstories
Here’s the promised new bun shaping technique… Here’s the promised new bun shaping technique…

Just follow the Cardamom Bun recipe from my book, then shape them this way — it’s easier than it looks!

You can also use this technique for:

~ Nordic cinnamon
~ Chocolate tahini
~ Blueberry & cream cheese
~ Pistachio, lime & rose
~ Hazelnut butter & date
~ Tosca
~ Festive
~ Saffron, almond & orange

Pretty swirled buns every time. 

Recipe from ’Buns, Sweet and Simple Bakes’. 

📌Link in bio to purchase.

@quadrillebooks 

💛 #BunsSweetandSimple #nordicbaking #CardamomBuns #BunShaping #bakefeed #bakedfromscratch #nordickitchenstories
Crimson leaves underfoot, pears in the basket, and Crimson leaves underfoot, pears in the basket, and a Frangipane Tart cooling by the window. A quiet sort of weekend. How was your’s?

#autumnwalks #pearseason #frangipanietart #slowliving #bakingdays #autumnvibes #britishcountryside #seasonaleating #nordickitchenstories
Bookings for our Christmas Workshops on 5th and 6t Bookings for our Christmas Workshops on 5th and 6th December are now open!
The workshop includes making your own festive wreath or table decoration, cookery demonstrations of Christmas canapés and mezze-style sharing plates, and a two-course lunch with a glass of fizz.

📌See the link in our bio for further details and to book. Hope you can join us!

#creativechristmas#thingstodoatchristmas#christmasprep#festivecanapes #learnsomethingneweveryday#festivedecor#decorateforchristmas #creativeclasses#thingstodoinberks#festiveactivities#nordickitchenstories #cookham#marlow#maidenhead#flowerfarming #nordickitchenstories #flowerfieldscookham
Guinea Fowl Meatballs with Barley & Mushroom Risot Guinea Fowl Meatballs with Barley & Mushroom Risotto.

A winter warmer that’s full of flavour — swap Guinea fowl for chicken if you like!

300–350 g minced guinea fowl or chicken thighs
1 small courgette, coarsely grated
1 garlic clove, minced
½ tsp ground cumin
½ tsp ground cinnamon
 pinch ground allspice
pinch chilli flakes
Small handful parsley leaves, roughly chopped
Small handful mint leaves, roughly chopped
½ lemon, zest only
S & P to taste
* 1 tbsp olive oil (for frying)

🍚 Barley & Mushroom Risotto
100 g pearl barley, rinsed
1 small onion, finely chopped
1 garlic clove, minced
150 g mixed mushrooms, sliced
320 ml chicken or vegetable stock (approx., more if needed)
1 tbsp chopped parsley
30 g Parmesan, grated
1 tsp full-fat cream cheese
Knob of butter + olive oil (for cooking)
S & P to taste
Crispy fried sage leaves

3. Meatballs: Salt courgette, rest 20 min, squeeze dry. Mix with mince, garlic, spices, herbs, lemon zest, salt & pepper. Shape into 15 balls. Brown in a hot pan with oil, then finish in a preheated oven until cooked through.
5. Mushrooms: Fry in a separate pan until golden. Set aside.
7. Risotto: Sauté onion in butter/oil 10 min. Add garlic, cook 2 min. Stir in barley, toast 2–3 min. Gradually add warm stock, stirring until barley is tender (about 25 min).
9. Finish: Stir in mushrooms, Parmesan, cream cheese, parsley & seasoning.
11. Serve: Spoon risotto into bowls, top with meatballs & crispy sage.

Comforting, earthy & full of flavour.

#guineafowl #chicken #pearlbarley #comfortfood #seasonaleating #tasty  #healthymeals #dinnerinspo #foodpics #tasty #foodie #autumnal #seasonalfood #yummy #foodblogger #instafood #homecooking #cozyevening #delicious #nordickitchenstories
Back from nine unforgettable days in glorious Meno Back from nine unforgettable days in glorious Menorca where my son and daughter-in-law had their wedding celebration. 
Sunshine, wonderful food (the most delicious amberjack carpaccio on stories), breathtaking sunrises and sunsets… and so many precious memories made. And no, I didn’t make the wedding cake, beautiful as it was.

Now back to reality — autumn has definitely arrived and there’s lots to plan. The colours are changing, the air is fresh, and it’s my favourite time of year: cosy layers and crisp walks. It’s always lovely being away, but there’s nothing quite like coming home.

@sjbinissaidahotel 

#wedding #tietheknot #celebration  #family #minorca #balearicisland #spain #sunshine
Nordic kitchen stories logo

Sign up to receive my latest recipes by email

Copyright © 2025 · Louise Hurst · Privacy Policy · All Rights Reserved · Website by Callia Web