• Skip to primary navigation
  • Skip to main content
  • Skip to primary sidebar
  • Skip to footer

Nordic Kitchen stories

Inspired by family recipes

  • Home
  • Recipes
    • Baking
    • Bread & Buns
    • Breakfast
    • Brunch
    • Cakes
    • Canapés
    • Desserts
    • Dinner
    • Drinks
    • Festive
    • Foraged Food
    • Fika
    • Fish
    • Healthy
    • Lunch
    • Main
    • Meat
    • Pickling
    • Preserving
    • Scandinavian
    • Snacks
    • Sourdough Baking
    • Soups
    • Starters
    • Vegan
    • Vegetarian
  • Bespoke Cakes
  • Workshops
    • Sourdough Baking Workshop
    • Nordic Baking Workshop
  • Photography
  • About

Berry & Lemon Custard Tart

25th August 2019 By Louise Leave a Comment

Lemon & Berry Custard Tart

Berry & Lemon Custard Tart

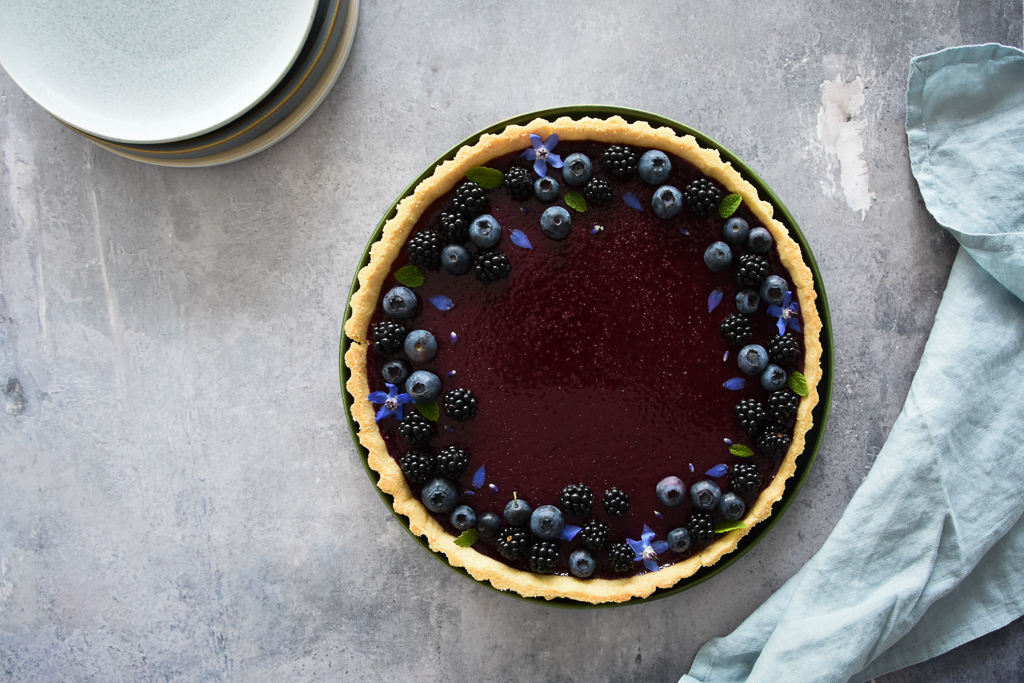
Autumn is almost upon us, August brings a softer golden light and a slight chill to the evening air.  I seized every opportunity I could this last week to forage for blackberries as they are so incredibly sweet this year.

This dessert was inspired by my love of lemon tart.  I adore the citrusy, creamy, custardy filling with an almond crust.  With an abundance of berries to hand it was only fitting to combine the two!

I’m so excited to share this recipe with you to celebrate natures bounty!

Black & Blueberries

Print Recipe

Berry & Lemon Custard Tart

Prep Time50 mins
Cook Time48 mins
Total Time1 hr 38 mins
Course: Dessert
Servings: 8 people

Equipment

  • 23cm Pastry tin

Ingredients

Pastry

  • 160 g plain flour
  • 40 g ground almonds
  • 100 g butter cold and diced
  • 25 g icing sugar
  • 3 ½ Tbls cold water

Berry puree

  • 200 g blackberries and blueberries, equal quantities (200g is the total weight)
  • 30 ml water

Filling

  • 4 eggs medium
  • 1 large lemon, zest of you should have 60ml juice
  • 130 g caster sugar
  • 80 ml double cream
  • 150 g berry puree

Instructions

  • Preheat the oven to 180Cfan/gas 5.
  • Begin by rinsing the berries in a colander and placing them into a medium saucepan with the water. Gently bring to a simmer and cook for 5-7 minutes. Blitz in a food processor to a puree then pass through a fine sieve. You don’t have to use a food processor it's just a little harder work pushing it through the sieve. You should end up with 150g puree. set to one side.
  • In a food processor place the flour, ground almond, icing sugar and butter. Pulse until it resembles breadcrumbs. Add the cold water and pulse until the dough just comes together. Turn out onto the work surface and form a ball. Wrap in greaseproof paper and rest in the fridge for 30 minutes. Dust a little flour onto your work surface and roll the pastry out to a large round or until its approximately 5cm bigger than the tin. Grease the base of the tin with a little butter. Tease into place and leave the excess edge to trim after baking. Prick the base with a fork and place in the fridge for 15 minutes.
  • Fill the pastry case lined with greaseproof paper with baking beans and place in the oven for 15 minutes. Remove the beans and bake for a further 6-8 minutes. Reduce the oven temperature to 150Cfan/gas2. Once the pastry case has cooled, shave the excess from the top edge of the tin with a microplane.
  • In the mean time make the filling. Crack the eggs into a medium bowl and whisk with a balloon whisk, add the sugar and cream and whisk again. Finally add the zest of the lemon, juice and the cooled berry puree. Whisk thoroughly to incorporate the ingredients. If possible place the baked pastry case onto a baking sheet in the oven then pour the custard into the pastry case in the oven. Shut the door gently. Bake for 25-30 minutes or until the custard has a slight wobble. Remove from the oven a cool. Decorate with more berries and a few mint leaves.
Lemon & Berry Custard Tart

Berry & Lemon Custard Tart

Share this:

  • Print
  • Facebook
  • Twitter
  • Pinterest

Filed Under: Baking, Desserts, Foraged Food Tagged With: baking, berries, custard, Lemon, Pastry

Previous Post: « Pickled Blackberries
Next Post: Slow Cooked Duck with Pickled Blackberries »

Reader Interactions

Leave a Reply Cancel reply

Your email address will not be published. Required fields are marked *

Recipe Rating


Primary Sidebar

About Louise

Hej, I'm Louise, a food enthusiast living in Marlow, Bucks, UK. Welcome to my culinary adventures in my Nordic Kitchen. Read More

Contact Louise

Topics

  • Facebook
  • Instagram
  • Pinterest

Newsletter

Please subscribe to receive all new recipes by email.

Latest posts

Wild Garlic and Crab Ravioli

1st April 2022

Charred Cabbage with Cauliflower, Miso puree.

Charred Cabbage with Cauliflower, Miso Purée

16th March 2022

Braised duck with Spiced Barley

Braised Duck Legs with Spiced Barley

27th February 2022

Swedish Sourdough Skorpor - (Rusks)

Swedish Sourdough Skorpor – (Rusks)

25th January 2022

Coconut and Spinach Dhal

Coconut and Spinach Dhal

20th January 2022

Footer

Follow Me on Instagram

As much as I love holidays and eating out, I do cr As much as I love holidays and eating out, I do crave a home cooked meal when I return. Lots of veg here, with a spicy peanut sauce (I add the juice of a lime to this to cut through the richness). This sounds complicated to make but it’s actually quite simple. 

Shiitake & Broccoli Satay, Peanut Sauce.

150g shiitake mushrooms
200g tenderstem broccoli 
3 Tbls soy sauce
1.5 Tbls lemon juice
1 clove garlic, minced
1 tsp minced ginger

130g red cabbage, shredded
Fine sea salt
1 Tbls white wine vinegar
 a handful beetroot leaves (because they were in my fridge & needed eating)
75g crunchy peanut butter
2 Tbls soy sauce
1 lime
1/4 tsp nutritional yeast
A good pinch chilli flakes
1 tsp runny honey
1 small clove garlic, minced

Served with 
Pre-blended Brown basmati, Camargue & wild rice blend. 

Begin with marinating the mushrooms & broccoli. Set to one side for 15 mins.
Place the cabbage in a bowl, season with salt and vinegar, massage and set to one side for 15 mins.
Place the peanut butter in a bowl, add the soy sauce, lime juice, chilli flakes, garlic and nutritional yeast, stir. Add 20-30 ml boiling water or until you have a runny emulsified sauce.

Sauté the mushrooms and broccoli on a high heat with the marinade in a frying pan with a tablespoon or so of water for 2-3 minutes. Tip into a warm bowl and cover.
Now briefly stir-fry the cabbage for 1-2 mins, then add the beetroot leaves, if using.
Spread the satay sauce on the plate. Add the cooked rice, then the vegetables. Top with chopped nuts and toasted seeds.
I’m writing this post from the beautiful city of I’m writing this post from the beautiful city of Porto, we are enjoying a few days stay. It feels so good to travel again. I’ve shared on stories our incredible meal @semea last night. But here’s a dish I made before we left…

This dish is a wonderful summer meal. The salad is also delicious in its own right or with chicken. I make it in advance, adding the beans when I am ready to serve. You can play around with the quantities and could add crumbled feta, or seeds and nuts etc.

Miso Salmon with pickled shallot & Chilli

2 salmon or sea trout pieces
2 tsp white miso
2 tsp runny honey
2 tsp Japanese soy sauce
2 tsp rice wine vinegar 
1 small clove garlic, minced
1 tsp minced ginger 

Combine all of the above and marinate the salmon/sea trout for 20 minutes before cooking.
Heat the oven or Airfryer to 180C and bake for 5 mins in the Airfryer or 8-10 in the oven. Grill for 1 minute to caramelise. (Or could be BBQ’d)

Fennel & Bean Salad
1 bulb fennel, very finely sliced, (I used a mandoline)
A handful French beans, blanched
Broad beans, podded and skinned

Dressing
1 tbls Lemon juice
1 tsp White wine vinegar 
3 Tbls Rapeseed oil
1 small clove garlic, minced
Fresh parsley leaves

Pickle 1 finely sliced chilli & shallot in 2 Tbls rice wine vinegar, 1 1/2 tsp sugar & 1/4 tsp salt.

In a small saucepan heat 1 tbls of the rapeseed oil and add the minced garlic, sauté on a low heat. Pour into small bowl and add the remaining garlic oil, vinegar, lemon juice and season. Add to the salad ingredients and toss.
One from the weekend, (you might have seen it on m One from the weekend, (you might have seen it on my stories) a 40th birthday cake for the lovely Ruth, looked as if she had a gorgeous weekend celebrating.

Fresh flowers from @maxwellandwebbpotager
I don't really know what to eat at the moment. Tod I don't really know what to eat at the moment. Today was supposed to be sunny but it seems almost cool enough for something warm for lunch - However I just gathered salad leaves & herbs from the veg patch in the rain, so salad it is.
Griddled Asparagus, raw courgette, peas, broad beans, salad leaves & herbs all dressed in Honey, Lemon & EVOO. Not forgetting the Honeyed Halloumi.

Heavenly heatwave next week…maybe?!
Remember I made lilac sugar last week? Well here’s what I did with it…
Lilac Madeleines, a post gardening teatime treat!

Lilac Madeleines

🌸Lilac Sugar
2 handfulls lilac blossoms, little stems removed
200g caster sugar
In a large jar alternate pouring the sugar and the petals into it. Seal the jar & place it in a cool, dark place for several days. Shake every couple days for 1-2 days.

Madeleines 
2 free-range eggs 
100g Lilac sugar
100 plain flour, plus extra for dusting
100g butter, melted & cooled slightly + extra for greasing
zest of a lemon 
¾ tsp baking powder

A handful unsalted pistachios, blitzed
Lemon juice
Icing sugar

Preheat the oven to 180C fan. Brush the madeleine tray with melted butter then shake in a little flour to coat, tapping away the excess.

Whisk the eggs & the sugar together in a bowl until light & frothy. Fold in the remaining ingredients. Leave to stand for 15 mins before pouring into the madeleine tray.

Bake for 8-10 minutes, or until the mixture has risen a little in the middle and is fully cooked through. Cool the madeleines on a wire rack.  Mix some icing sugar with lemon juice to make a thin glacé icing. Dip the Madeleine in the lemon icing, then the blitzed pistachios.

Best eaten within an hour of baking 😀
With delicate, pure white bell-like flowers, Lily With delicate, pure white bell-like flowers, Lily of the Valley tells us that summer is on the way. The scent is gorgeous but all parts of this plant are poisonous. 

It’s one of my favourite May flowers and supposedly symbolises happiness. What’s your’s?

Copyright © 2022 · Nordic Kitchen stories | Cookie Notice | Website by Callia Web