• Skip to main content
  • Skip to after header navigation
  • Skip to site footer
Nordic kitchen stories logo

Nordic Kitchen stories

Inspired by family recipes

  • Home
  • Recipes
    • Baking
    • Breakfast
    • Brunch
    • Cakes
    • Desserts
    • Dinner
    • Drinks
    • Festive
    • Fika
    • Fish
    • Foraged Food
    • Gluten-Free
    • Healthy
    • Lunch
    • Main
    • Nordic
    • Pickling
    • Preserving
    • Salads
    • Sharing
    • Snacks
    • Soups
    • Sourdough Baking
    • Starters
    • Vegan
    • Vegetarian
  • Bespoke Cakes
  • Workshops
    • Sourdough Workshops
    • Nordic Baking Workshop
    • Pastry – Savoury Tarts
  • Work with me
  • Buy my book
  • About

Easy Kefir Sourdough Flatbreads

26th January 2023 by Louise
Easy Kefir Sourdough Flatbreads

I do like a freshly baked flatbread, especially if it’s made from my sourdough starter. I am especially happy if there are a few stashed in the freezer: great to have as a side with a Middle Eastern inspired meal, dhal or simply to fill with leftovers from the fridge to make a sandwich.

You can make flatbreads from just flour, baking powder and water; while other recipes call for fast action yeast. However, if, like me you bake sourdough bread these are perfect to knock up relatively quickly. They have a better flavour and texture, firstly because of the starter and secondly the kefir (or yogurt). I should also add, if you are fairly new to baking with wild yeast, this is a good beginners recipe.

These Easy Kefir Sourdough Flatbreads can be made from discard or an active starter and are proved overnight at room temperature. All you have to do the following day is divide the dough, then shape. I simply ‘bake’ them in a heavy based pan. It really couldn’t be more simple.

I have used a rye starter in this recipe, this adds a touch of wholegrain to the dough. If you feed your starter with white flour but you like the idea of adding wholegrains too, I suggest substituting 50g of the white flour with wholegrain rye or spelt.

  • Dough after 8-12 hours
  • Easy Kefir Sourdough Flatbreads
    Shape into 10cm discs
  • Bake on one side for approximately 1 minute
  • Easy Kefir Flatbreads
    and the same on the other side.

Try different flavours

  • Finely chop garlic & fresh coriander mixed with a little oil, brush on the flatbread while it’s still hot.
  • Add a tablespoon each of black & white sesame seeds to the dough.
  • Add 1 teaspoon Nigella seeds & 2 teaspoons za’atar to the flour before adding the liquid. Press a little more za’atar onto the surface of the flatbread before baking.
  • Drizzle with extra virgin olive oil & sprinkle with finely grated parmesan just as the flatbread comes out of the pan.
Print Recipe
5 from 1 vote

Easy Kefir Sourdough Flatbreads

An Easy Kefir Sourdough Flatbread using active or discarded starter. a delicious side to Middle Eastern food, dhal or curries.
Prep Time20 minutes mins
Cook Time15 minutes mins
8-10 hours proving time10 hours hrs
Course: Lunch/Dinner
Servings: 7 flatbreads

Equipment

  • Heavy based pan

Ingredients

  • 340 g organic strong white flour or 290g white + 50g wholegrain flour
  • 80 g active starter or discard, 100% hydration no more than 4 days old
  • 1 tsp runny honey
  • 6 g fine sea salt
  • 15 ml olive oil
  • 200 ml water 36-38°C
  • 45 g kefir or natural yogurt

Instructions

  • Take the kefir or yogurt, and starter out of the fridge one hour before preparing the dough. I begin this process around 6.30pm or first thing in the morning to bake just before an evening meal.
  • In a bowl, combine the water, honey, olive oil, starter and kefir (or yogurt). In another bowl add the salt to the flour. Pour the wet ingredients over the dry. To begin with, stir with a spoon until a dough begins to form. Now use one hand to bring the dough together to become a uniform dough. Cover, then do 2-3 stretch and folds at 20-30 minute intervals. Now cover with a shower cap or pop the bowl in a large polythene bag and leave in the kitchen overnight (8-12 hours). If your kitchen is especially warm find a cooler spot in the house.
  • First thing next day: tip the dough out onto a floured work surface, divide into 6-7, depending on how big you like them. Gently shape into buns, then cover with a tea towel. Leave for 15-20 minutes.
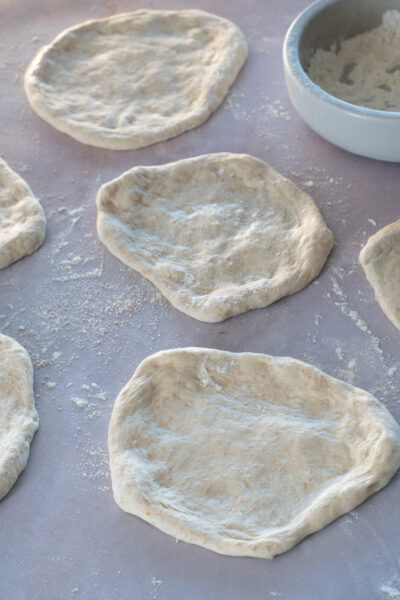
  • Now gently stretch the dough until you have a disc of approximately 10cm. If you find this difficult you can use a rolling pin, but be gentle with it, you don’t want to roll all the air out of the dough.
  • Heat a heavy based pan on high. Place a flatbread in the pan, bake for 60-90 seconds, then flip over. Remove once baked and wrap in a clean tea towel. Repeat with the remainder.

Notes

Freeze on the day of baking in a freezer bag. 

Share this:

  • Click to print (Opens in new window) Print
  • Click to share on Facebook (Opens in new window) Facebook
  • Click to share on X (Opens in new window) X
  • Click to share on Pinterest (Opens in new window) Pinterest
  • Click to email a link to a friend (Opens in new window) Email
Category: Autumn, Baking, Healthy, Snacks, Sourdough Baking, Spring, Summer, Vegetarian, WinterTag: baking, healthy, sourdough baking, sourdough discard, sourdough starter
Previous Post:Seville Orange Marmalade
Next Post:Thai Crab Noodle Soup

Reader Interactions

Comments

  1. Jennifer

    12th April 2023 at 8:53 pm

    5 stars
    Hi Louise,

    I have now made these several times since you have posted the recipe – totally love them!
    Initially I used the dough to make garlic and coriander naan (brushed with garlic infused melted butter and sprinkled some chopped fresh coriander) – a total hit with my friends.
    Now I also love to have plain ones in the freezer to top with anything – have even used them as pizza base – brilliant!

    Thanks a lot,
    best wishes,
    Jen
    @tasteimpressions

    Reply
    • Louise

      13th April 2023 at 10:38 am

      Hi Jen,

      Great to hear! I also keep a few in the freezer, so handy as a side to curry or middle Eastern dishes. Thanks for taking the time to comment, its appreciated :-))

      Reply
  2. Lisa Wilson

    13th May 2023 at 9:15 am

    Just made my first batch, delicious, especially warm! Can I ask if you can rewarm them when they have thawed from the freezer? Thanks!

    Reply
    • Louise

      15th May 2023 at 6:36 am

      Hi Lisa, I’m so pleased they turn out well. Yes absolutely, you can reheat them in the oven.

      Reply
  3. Maria Kelly

    11th February 2024 at 8:43 am

    So you begin at 6.30 in the morning and mix the doug and knead it at 20-30 min intervals. Is that all day? Because the next instruction is to leave it overnight. That seems like a very labour intensive method and depends on you being in the house all day. Is this correct?
    Thanks,
    Maria

    Reply
    • Louise

      11th February 2024 at 9:14 am

      Hi Maria, it’s 6.30pm (18.30) for an overnight prove. If you begin the process in the morning, you’re simply mixing the ingredients together, then doing 2-3 stretch and folds at 30 minute intervals, no more. Then it’s left to prove. Hope that answers your question.

      Reply
      • bent

        11th April 2024 at 10:25 pm

        can i leave it in the fridge over night ? because its very hot where i live

        Reply
        • Louise

          12th April 2024 at 7:26 am

          Yes, sure, prove in the fridge for approx. 10-12 hours.

          Reply

Leave a Reply Cancel reply

Your email address will not be published. Required fields are marked *

Recipe Rating


A Spanish tortilla of sorts 🍳 Gorgeous rainbow ch A Spanish tortilla of sorts 🍳

Gorgeous rainbow chard and a good grating of hard cheese makes this anything but traditional.

The key is taking your time with the potatoes and onion, frying them low and slow in a generous amount of olive oil for at least 25 minutes before the chard and garlic go in. Don’t rush it.

I used 7 eggs but on reflection 8 or 9 would’ve been better for my pan. 

Perfect for weekend brunch or a proper sit-down lunch, I love it with quick pickled red cabbage and a green salad. Simple, colourful and so good.

#spanishtortilla #tortilla #rainbowchard #hardcheese #weekendeggs
New dates added for April and May. Tap on the link New dates added for April and May. Tap on the link in my profile for more information.

#workshop #buckinghamshire #sourdough baking #learnsomethingnew
I’d almost forgotten how satisfying it is to make I’d almost forgotten how satisfying it is to make your own yogurt. A surplus of milk from the milkman this week gave me just the reason I needed to get back into it.

One of the simplest things to make. All you need is 1 litre of whole milk, (semi-skimmed will work but whole milk gives you a thicker and creamy yogurt) 1 tablespoon of skimmed milk powder, and 2 tablespoons of live yogurt to get things going.

Heat your milk to 85°C, let it cool down to 40-45°C, stir in the yogurt, pour into sterilised jars and keep it at that same temperature if you can for 6-8 hours.

If you’d like Greek style yogurt, just strain through a muslin.

#homemadeyogurt #yogurtmaking #fromscratch #milkman #greekyogurt
Still firmly in comfort food territory over here. Still firmly in comfort food territory over here. Yes, I’ve spotted the tiniest hints of spring, the hawthorn has just started to blossom, which honestly feels like a miracle, and almost a full day of sun yesterday! But I’m still craving something warm and satisfying.

So tonight roasted organic chicken thighs, sitting on a creamy white bean purée, onion and garlic sautéed until soft, then blended until silky and rich. Then I remembered I had a sad little bunch of cavolo nero lurking in the fridge, so I blanched and blitzed it into the most gorgeous dark green pesto with garlic, cashew nuts, EVOO, Parmesan and a bright little spritz of lemon.
Finished the whole thing off with crispy rosemary and a few quick pickled red onions on top…because honestly, is there anything better than crispy rosemary and that little hit of acidity to cut through it all?
Nourishing and indulgent at the same time.​​​​​​​​​​​​​​​​

#ComfortFood #chickenthighs #WhiteBeanPuree #cavolonero #kalepesto
Seared Hake with braised Fennel, Olives, and Citru Seared Hake with braised Fennel, Olives, and Citrus.

I’ve been craving brighter, zingy flavours lately, the kind that wake up your tastebuds and remind you that winter doesn’t have to be all heavy and rich. 
There’s something about the delicate, flaky texture of hake that pairs perfectly with bright Mediterranean flavours.

Seared Hake with Braised Fennel & Citrus
Serves 2
	∙	2 hake fillets
	∙	2-3 fennel bulbs, cut into 6
	∙	1 leek, finely sliced
	∙	½ small blood orange, juiced
	∙	1 small lemon
	∙	5 green olives, quartered
	∙	1 tbsp capers
	∙	6 tbsp extra virgin olive oil
	∙	120ml white wine or stock
	∙	2 garlic cloves, sliced
	∙	a good pinch Aleppo pepper
	∙	Salt and pepper
	∙	Fresh herbs (optional)

1. Sear the fennel in batches in a shallow pan with 2 tbsp olive oil over medium heat. Then return to the pan with the leek, and garlic, season with salt (you can add a tsp of flour if you like a slightly thickened sauce). Cook 3-4 minutes, add wine/stock and juice of half a lemon, cover and braise 15-20 minutes, until tender.

2. Zest a little of the orange & lemon into a bowl. Add the blood orange juice, lemon juice, 3 tbsp extra virgin olive oil, Aleppo pepper, and a pinch of salt & whisk.

3. Pat hake dry, season with salt and pepper. Heat remaining oil in a cast iron pan over medium-high heat. Sear for 3-4 minutes, flip and cook for 2 more minutes or until just cooked through.

4. Add the olives & capers to the fennel and leek. Serve, top with hake, drizzle generously with the citrus-Aleppo dressing. Finish with fresh herbs.​​​​​​​​​​​​​​​​

#hake #fennel #citrusseason #dinnertonight #fishrecipe
I thought it high time I shared these beauties. It I thought it high time I shared these beauties. It’s that time of year again - Semlor Season. I’ve been making these fluffy cardamom buns filled with almond paste and crowned with whipped cream, and thought I’d share. 
The only tweak I’ve made to the recipe in my book? (P135) A pinch of Maldon salt in the filling, which really lifts the almond flavour. Trust me on this one. 

#semlor #semla #cardamombuns #almondfilling
Nordic kitchen stories logo

Sign up to receive my latest recipes by email

Copyright © 2026 · Louise Hurst · Privacy Policy · All Rights Reserved · Website by Callia Web