• Skip to main content
  • Skip to after header navigation
  • Skip to site footer
Nordic kitchen stories logo

Nordic Kitchen stories

Inspired by family recipes

  • Home
  • Recipes
    • Baking
    • Breakfast
    • Brunch
    • Cakes
    • Desserts
    • Dinner
    • Drinks
    • Festive
    • Fika
    • Fish
    • Foraged Food
    • Gluten-Free
    • Healthy
    • Lunch
    • Main
    • Nordic
    • Pickling
    • Preserving
    • Salads
    • Sharing
    • Snacks
    • Soups
    • Sourdough Baking
    • Starters
    • Vegan
    • Vegetarian
  • Bespoke Cakes
  • Workshops
    • Sourdough Workshop
    • Nordic Baking Workshop
    • Pastry – Savoury Tarts
  • Work with me
  • About
  • Yulefest Ebooklet

Seville Orange Marmalade

19th January 2023 by Louise
Seville Orange Marmalade

One of the joys of winter is the arrival of the citrus season. Naval and Seville oranges from Spain are at their best from December though to February. Here in the UK, we are the biggest consumers of this bitter Seville orange. The depth of flavour is perfect for cooking, unlike its sweeter cousin, the Naval. Seville Orange Marmalade on toast is my favourite weekend treat. So I set aside a few hours on a grey January day to make this blazing amber preserve.

Seville Oranges

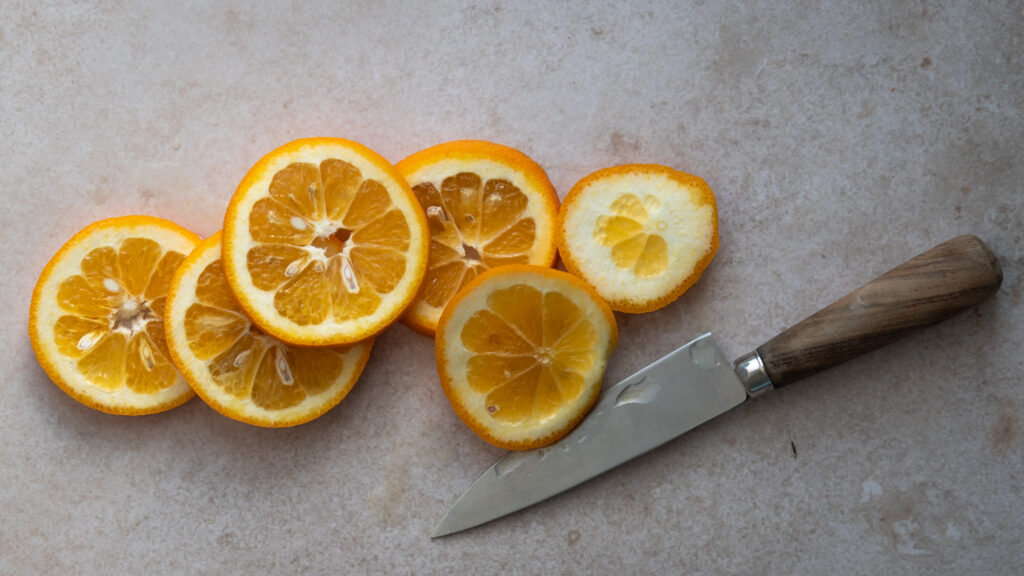
Sevilles have rough, dimpled textured yellow-orange skin with pale, almost translucent flesh and plenty of pips. When the fruit is ripe it is exceptionally juicy with a tart, sour tang. The pectin is stored in the pith, great for marmalade, but extremely bitter by itself. It is therefore important to add any discarded pith to the muslin pouch and submerge in the water when cooking the skins.

Now I know marmalade contains A LOT of sugar. I try and keep the consumption of it to a minimum however it is simply not possible to reduce the amount drastically in marmalade. You see the sugar in the recipe is not just added for sweetness; it also helps gel the ingredients together to create a thick, sticky consistency.

Talking of consistency, I have never used preserving sugar. There should be enough pectin from the lemon juice, pith and pips as mentioned above, to set this preserve.

Print Recipe

Seville Orange Marmalade

Makes 5-6 jars. A delicious topping for your toast or a wonderful addition to cakes and savoury dishes.
Prep Time50 minutes mins
Cook Time2 hours hrs 20 minutes mins
Total Time3 hours hrs 10 minutes mins
Course: Breakfast
Keyword: preserved,, seasonal,

Ingredients

  • 1 kg Seville oranges
  • 1 unwaxed lemon
  • 1.9 kg granulated sugar

Instructions

  • Thoroughly wash the oranges and lemon, then cut in half and squeeze out the juice. Take a teaspoon and scrape away all the flesh and some of the pith of the orange halves. Place a sieve over a bowl lined with a muslin. Tip all the pips, pith and flesh into the muslin (you can use a clean jcloth). Tie with string and place in a large pan, tying the string to the handle. Add 2 litres of water.
  • Discard the lemon shell. Now finely cut the peel into strips; add to the pan.
  • Bring the mixture to the boil, then reduce the heat and simmer, uncovered, for 1.5-2 hours, or until the peel is very soft and the liquid has reduced by approximately half. Remove and discard the muslin bag, squeezing as much liquid as possible back into the pan between 2 plates.
  • Put a saucer in the freezer to chill. Add the sugar to the pan; stir over a low heat until dissolved. Turn up the heat and boil rapidly until it reaches setting point – (if you have a thermometer 102-105°C), about 15 minutes. To test, remove from the heat and spoon a little onto a chilled plate. Let it cool for a few seconds, then push with a finger. If the surface wrinkles, it’s ready; if not, boil for 5 minutes more and test again. Leave to settle for 30 minutes (this will prevent the orange rind floating to the top of the jar). Skim off any foam with a ladle. Stir and pour into warm sterilised jars. Seal when cool, then store in a cool, dark place for up to 3 months. Once open, store in the fridge for up to a month.

Try adding Seville orange marmalade to:

  • Add a spoonful to Greek-style yogurt.
  • Use in Crepes Suzette.
  • Cakes.
  • Marinate sliced clementines with 1-2 teaspoons of marmalade and serve with panna cotta.
  • Use in a glaze for roasted chicken thighs with a hint of chilli and garlic.
  • Add a little to the pan juices after sautéing duck breasts.
Citrus Fruit

Share this:

  • Print
  • Facebook
  • Twitter
  • Pinterest
  • Email
Category: Breakfast, General, Preserving, WinterTag: Gluten free, preserved, seasonal, seville oranges, winter
Previous Post:Swedish Saffron and Almond Buns
Next Post:Easy Kefir Sourdough Flatbreads

Reader Interactions

Leave a Reply Cancel reply

Your email address will not be published. Required fields are marked *

Recipe Rating


SPICED CHEESE & ONION BRIOCHE 1 large onion, fine SPICED CHEESE & ONION BRIOCHE

1 large onion, finely sliced
Olive oil for frying
1.5 tsp za’atar
0.5 tsp sumac
S & P
Soft cheese, ie. Camembert, Brie, Tallegio

Brioche (Enriched Dough)
400g strong white flour
220ml milk, warmed
6g fast action yeast
35g butter, room temperature
1 egg, lightly beaten
6g fine sea salt

Beaten egg for glazing
Sesame seeds 

1️⃣ Add the flour, yeast and salt to the bowl of a free standing mixer. Warm the milk to 38C and with the motor running on medium add the milk to the flour, follow with the egg, then the butter. Mix on medium for 5-6 minutes. Place in a bowl, cover and prove for 30-40 minutes or place in the fridge to use the following day if preferred.

2️⃣ Divide the dough into 8 and roll with a cupped hand into buns. Then with a rolling pin, flatten and roll into a disc shape. Place on a lined tray. Top each disc with cheese, then follow with the cooled onion mixture. Cover and prove for 30-40 minutes. Brush with beaten egg, then sprinkle with sesame seeds
Bake in a preheated oven on 200C fan for 10-12 minutes. Eat warm. (Freeze on the day of baking). 
.
.
.
.
.
#christmasfood #christmasbaking #bakefeed @britainsbesthomecooks_ #moodylight #brioche #feedfeed #recipereels #delicious #nordickitchenstories
Could there be a more festive-looking soup than th Could there be a more festive-looking soup than this? With the arrival of December on Friday, my attention turns towards Christmas and all its preparations…

I made this nourishing and hearty bowl of goodness using the 'Maris Bead' Fava Beans from my variety box from Hodmedods. A riff on Olia Hercules recipe for borsch.

Here’s what I did…
If using dried beans, drain the soaked beans and cook in a saucepan of boiling water for 45-60 minutes or until soft.
Pour 1.5 litres of veg or chicken stock into a large saucepan, put on the hob over a medium-high heat and bring to the boil. Add approx 300g diced celeriac or potato to the pan and boil for about 8-10 mins.

Heat a generous glug of olive oil in a large shallow pan over a low-medium heat. When it’s hot, add a finely chopped onion and cook, stirring, until it softens (approx 10 mins). You’re looking to slightly caramelise the onion and. Now add 2 large peeled beetroot, cut into matchsticks (I used a mandolin) and cook for 5 minutes before stirring in a can of chopped tomatoes.
Boil for a few minutes, then tip the contents of the frying pan into the saucepan with the stock and potatoes/celeriac. Add half a small white or red cabbage and drained beans. Simmer for 3-4 minutes – you may need to add more stock or water to loosen. Taste the soup, season if necessary.
Ladle the soup into bowls and serve with crème fraîche or Greek style yogurt and a few chopped fronds of dill, parsley & sunflower seeds.
Yesterday morning began early with a refreshing ch Yesterday morning began early with a refreshing chill in the air and stunningly bright blue skies. My Pepparkakor workshop at @the.maker.space was delightful, filled with both familiar and new faces. We made, baked, and decorated dozens of ginger thins. 
We don’t get many winter days like this so I couldn’t resist taking a walk under the afternoon sun. Did you notice the angle cloud? 

#workshops #learnsomethingnew #pepparkakor #oxfordshire
Interesting feedback on your preference between Re Interesting feedback on your preference between Reels and stills on stories! It appears most of you favour stills. This post was initially going to be a video, well I’ve struck half way between the two😅 (video now on Stories, saved in highlights).

We enjoyed them paired with pickled red cabbage, quinoa and salad for lunch. They're also great as part of a mezze meal or served smaller as canapés. 

Yellow Pea & Pumpkin Croquettes 

350g pumpkin, roast & skin
150g dried whole yellow peas (or split) soaked overnight
1/2 small onion, finely chopped 
1-2 garlic cloves, minced
1 tbsp finely chopped flat-leaf parsley
1 tbsp finely chopped coriander
1/4 tsp cayenne pepper 
1/2 tsp ground cumin
1/2 tsp ground coriander 
1/4 tsp ground cardamom 
1/2 tsp baking powder
sunflower oil for brushing

Serve with herby Greek yogurt, (I added chopped dill)

12 croquettes 

1. Place the yellow peas (or split peas) in a bowl and cover with cold water at least twice their volume. Set aside to soak overnight.
2. The next day, drain the peas and combine them with the onion, garlic, parsley and coriander. Pulse in a food processor 2-3 times, (if using split peas pulse twice) until it is finely chopped, but not mushy or pasty, and holds itself together. Once processed, add the spices pumpkin, baking powder, 1/2 teaspoon salt. Mix well by hand until smooth and uniform. Cover the mixture and leave it in the fridge for 1 hour or until ready to use.
3. Shape into croquettes, brush with oil and grease the air fryer tray too. Airfry on 160C for 15-20 minutes or until golden. Serve with Herby Greek yogurt.
Been a while since I shared one of my celebration Been a while since I shared one of my celebration cakes! For those who've followed me for a while will know chocolate isn't my top pick, however I adore designing chocolate cakes. 

This one taught me not to recommend it as a birthday cake... Picture it with candles and delicate chocolate curls - chocolate snowflakes, if you will! 😳
Guinea Fowl Meatballs with Barley & Mushroom Risot Guinea Fowl Meatballs with Barley & Mushroom Risotto

Here’s a winter warmer!
It’s not often I post poultry or meat on my feed. I do occasionally like to eat it though, especially Guinea fowl, it’s such a tasty bird. This can be made with chicken too. 

300-350g minced Guinea fowl or chicken thighs 
1 small courgette, coarsely grated
1 garlic clove, minced
½ tsp ground cumin
½ tsp ground cinnamon
A pinch ground allspice
A pinch chilli flakes
small handful parsley leaves, roughly chopped
small handful mint leaves, roughly chopped
½ lemon, zest only

100g pearl barley, rinsed
1 small onion, finely chopped
1 clove garlic, minced 
150g mixed mushrooms, sliced
320ml approx chicken or veg stock
1 Tbls chopped parsley 
30g Parmesan, grated 
1 tsp cream cheese, full-fat

Fried crispy sage

(Serves 2-3)

For the meatballs. Place the grated courgette in a colander & sprinkle with a little salt. Leave for 20 minutes, then use your hands to squeeze out as much liquid as possible.
Transfer to a bowl with the chicken, garlic, spices, herbs, lemon zest, a generous sprinkling of salt & plenty of pepper. Using wet hands, shape into about 15 small balls.
Pour 1 Tbls oil into a large non-stick sauté pan, and place on a high heat. Once hot, add half the meatballs and fry for 2-3 mins, turning throughout until golden brown all over. Transfer the meatballs to a baking tray, repeat with the remainder. Now finish cooking in a preheated oven. 

In a frying pan, set to high, add a little oil and fry the mushrooms until golden. 
Heat a pan over a medium heat. Add a knob of butter & a little olive oil, once melted, add the onion a pinch of salt. Gently fry for 10 minutes, or until the onion is translucent. Add the garlic and continue to cook for two minutes.
Now add the pearl barley. Turn up the heat and cook for 2-3 minutes. Turn down the heat to medium and add a ladleful of warm stock. Stir well to mix &, once absorbed, add another ladleful, stirring now & again. Repeat until the stock is used up or the barley is tender approx 25 mins. *you may need to add a little more stock.
Add the mushrooms, taste & season to taste with S & P. Add the Parmesan, cream cheese & crispy sage.
Nordic kitchen stories logo

Sign up to receive my latest recipes by email

Copyright © 2023 · Louise Hurst · Privacy Policy · All Rights Reserved · Website by Callia Web