• Skip to main content
  • Skip to after header navigation
  • Skip to site footer
Nordic kitchen stories logo

Nordic Kitchen stories

Inspired by family recipes

  • Home
  • Recipes
    • Baking
    • Breakfast
    • Brunch
    • Cakes
    • Desserts
    • Dinner
    • Drinks
    • Festive
    • Fika
    • Fish
    • Foraged Food
    • Gluten-Free
    • Healthy
    • Lunch
    • Main
    • Nordic
    • Pickling
    • Preserving
    • Salads
    • Sharing
    • Snacks
    • Soups
    • Sourdough Baking
    • Starters
    • Vegan
    • Vegetarian
  • Bespoke Cakes
  • Workshops
    • Sourdough Workshops
    • Nordic Baking Workshop
    • Pastry – Savoury Tarts
  • Work with me
  • Buy my book
  • About

Roasted Almond Filled Semlor

1st February 2023 by Louise
Roasted Almond Filled Semlor
Roasted Almond Filled Semla

Now I must tell you, I already have a recipe for Semlor Buns on here. Don’t get me wrong, I love the classic pastry however on a trip back to Sweden last year, we ate the best Roasted Almond Filled Semlor buns ever. So here is my version of THOSE buns.

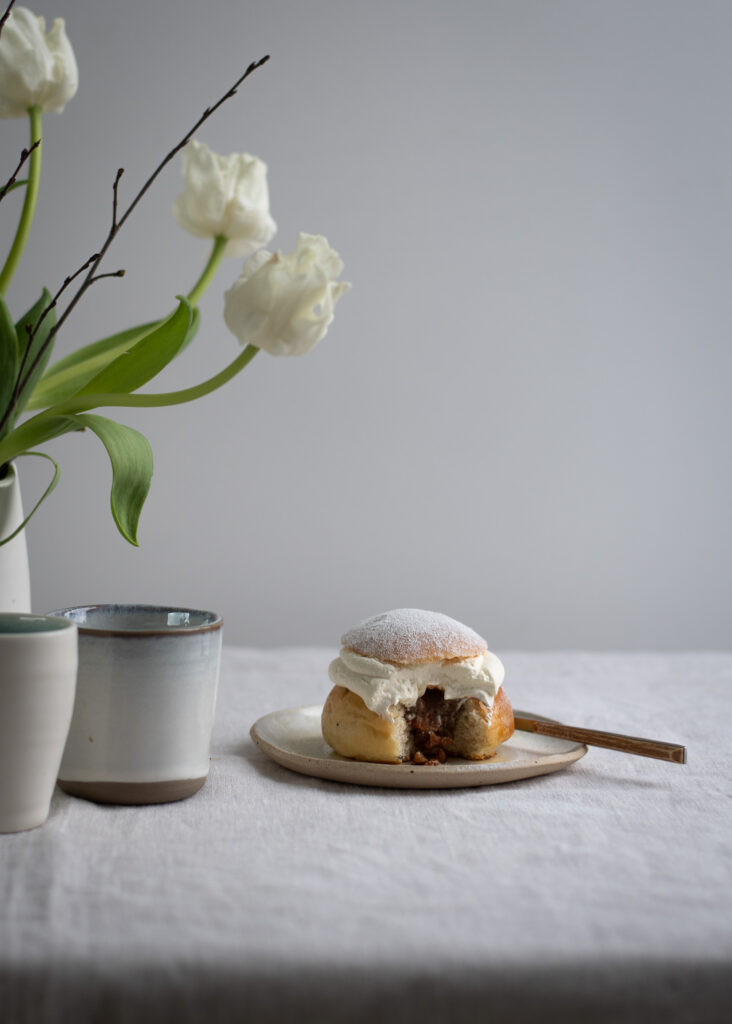
Swedish Semlor buns, enriched sweetened dough flavoured with cardamom and filled with almond paste and whipped cream. Light as a feather and mouthwateringly delicious. Semlor usually appear in bakeries in Sweden as near after Christmas as deemed decent but traditionally eaten on Shrove Tuesday, fettisdagen Swedes polish off a fair few of these enticing cream buns. Some like semla served with a splash of hot milk, poured over the top of the bun and served as a dessert.

Now for the method. I’m using my basic enriched dough recipe including the tangzhong technique. I’ve incorporated this method in to nearly all of my enriched bread dough recipes. The result is soft, fluffy buns, that stay fresh a little longer. What is it you ask? A Japanese yeasted bread technique that involves cooking a portion of flour and liquid, heated to boiling, until it thickens to a paste. It’s then cooled and added to the flour along with the other ingredients.

I firmly believe that all enriched sweetened dough benefits from a slow prove in the fridge overnight. It becomes easier to work with due to the gluten having time to relax fully. There’s no need to warm the milk before adding the yeast either.

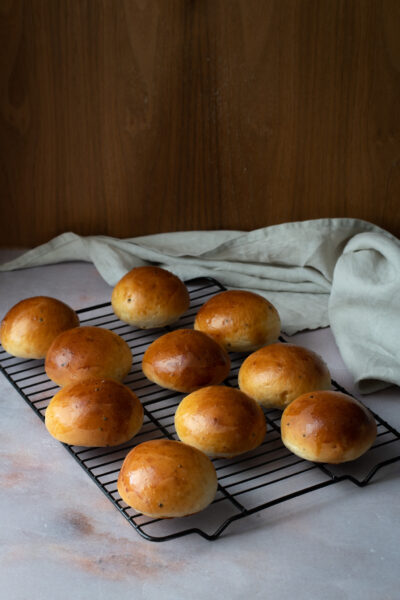
Shaping the dough into buns can take a little practice, however cupping your hand and rolling in a circular motion at the same time will eventually create a neat ball. You can either opt to make 10 big or 14 mini buns in this recipe. Once they are baked and cool you have two options, slice across the top or cut in a triangular shape. Then remove approximately a third of the crumb to use in the filling.


Unbaked Semlor Buns
Semlor Buns after proving.
Baked Semlor Buns
Baked Semlor Buns

The difference in this recipe is the roasted almonds, they add extra flavour to the already delicious paste. Not only that reserving some of the nuts to chop by hand adds a lovely texture. 

DID YOU MAKE THIS RECIPE for roasted almond filled semlor?

I would love to know how it turned out. Please let me know by commenting below. Or you could snap a photo and share and tag it on Instagram @nordickitchenstories.

Print Recipe
5 from 1 vote

Roasted Almond Filled Semlor

With a roasted almond paste filling this is updated recipe for the classic Semlor Buns.
Prep Time45 minutes mins
Cook Time15 minutes mins
Total Time1 hour hr
Course: Dessert/Fika
Cuisine: Scandinavian, Swedish
Servings: 10 big buns or 14 mini.

Ingredients

  • 1 x Enriched Basic Dough  *See notes

Roasted Almond Paste

  • 150 g whole skin on almonds
  • 110 g caster sugar
  • 1-2 tbls water
  • 2-4 tbls milk

Whipped Cream

  • 350 ml double cream
  • 1/2 tsp vanilla extract
  • 1 tsp icing sugar

Instructions

  • Make the basic enriched dough, then prove.

Roasted Almond Paste

  • Begin with the almond paste: Preheat the oven 175°C. Place the almonds on a baking tray and roast in the centre of the oven for 8-10 minutes. Cool. Now pulse 120g of the almonds in a food processor until it comes together and is ‘paste like’. You may have to add a little water. Tip into a bowl and add the sugar. Chop the remaining nuts coarsely and add to the paste. Stir to distribute the coarsely chopped nuts evenly. Pop into a jar with a lid and store in a cool place until needed.

Buns

  • When you're ready to bake the next day knock back the dough and divide into 10 (65g) or 14 (46g) even pieces. Roll each piece in turn on a lightly floured work surface using your cupped hand until it forms a smooth bun. Place the buns on a baking sheet lined with greaseproof paper. Leave to prove covered for 45-60 minutes depending on the room temperature. (To speed the proving up you can place the buns in the oven, SWITCHED OFF with a bowl of freshly boiled water, don’t cover them).
  • Meanwhile pre-heat the oven 190°C fan/Gas 7.
  • Brush each bun with egg wash and then bake in the centre of the oven for 12-14 minutes or until golden brown. Leave to cool on a wire rack.
  • Once the buns have cooled, they need to be hollowed out. You can either cut a triangle or literally slice the top off, then scoop out a little of the insides. Keep half of the crumbles and place in a bowl with 200g almond paste. Now add 2 tablespoons of milk, and mix to form a paste. It should be a nice soft pipe-able consistency, you may have to add more milk.
  • Add 1-2 teaspoons of icing sugar and the vanilla extract to the cream and whip until the cream just holds its form.
  • Fill the buns with the almond mixture using a spoon or a piping bag. Pipe or spoon the cream on top and then put the tops back on. Dust with icing sugar and enjoy.
  • Eat on the day, or day after baking. Store in a plastic container with a lid in the fridge.

Notes

Here is the recipe for Enriched Basic Dough 
Unfilled buns can be frozen on the day of baking.

Share this:

  • Click to print (Opens in new window) Print
  • Click to share on Facebook (Opens in new window) Facebook
  • Click to share on X (Opens in new window) X
  • Click to share on Pinterest (Opens in new window) Pinterest
  • Click to email a link to a friend (Opens in new window) Email
Category: Baking, Desserts, Nordic, SpringTag: baking, fika, nordic flavours, scandinavian, scandinavian flavours
Previous Post:Thai Crab Noodle Soup
Next Post:Creamy Horseradish Soup with Parsley OilCreamy Horseradish Soup with Parsley Oil

Reader Interactions

Comments

  1. Hae

    3rd March 2025 at 4:42 pm

    5 stars
    Thank you so much for the recipe! I made 21 small semlor and they were a big hit! The instruction was clear and easy to follow.

    Reply
    • Louise

      3rd March 2025 at 5:11 pm

      Very happy to read this. Thank you for taking the time to comment :-))

      Reply

Leave a Reply Cancel reply

Your email address will not be published. Required fields are marked *

Recipe Rating


Happy Easter to everyone celebrating. The Swedish Happy Easter to everyone celebrating.

The Swedish half of me tends to take over in the kitchen at this time of year. Here are just a few of the things I’ve been cooking and baking this weekend — smörgåstårta using home-baked sourdough with savoury fillings. 

An appetiser of whipped cream cheese with fresh grated horseradish and lemon zest, topped with smoked salmon, pickled red onion and cucumber.

And buns filled with forced rhubarb and custard, which I think is a pretty hard combination to beat.

Our magnolia tree is stunning this year too — one of my favourite signs that spring is finally here. Hope everyone’s having a good one 🌷​​​​​​​​​​​​​​​​

#easter #easterweekend #swedishfood #scandinavianfood #homecooking
Now that we’re in wild garlic season this is a spr Now that we’re in wild garlic season this is a spring gratin worth making. You can swap half the potato for celeriac — it brings an earthiness that balances the richness of the cream and the smokiness of the salmon beautifully.

Wild Garlic, Potato & Hot Smoked Salmon Gratin — serves 4

250g hot smoked salmon, flaked
900g King Edward potatoes, peeled & thinly sliced (or swap with 450g for celeriac)
2 leeks, white part only, sliced
2 cloves wet garlic, sliced (or 1 regular clove)
80g wild garlic, roughly chopped
180ml whole milk
245ml whipping or double cream, or crème fraîche
35g mature hard cheese, grated
Butter and olive oil, for sautéing

Preheat the oven to 180°C fan. Sauté the leeks in a little butter and olive oil until soft, then add the wild garlic and wet garlic and cook until the leaves have wilted. Gently heat the milk and cream with 25g of the cheese, whisking until smooth. 

Layer the potatoes, leek mixture and flaked salmon in a baking dish, seasoning lightly between each layer, and finish with a top layer of potato and a few wild garlic leaves. Pour over the cream sauce and scatter with the remaining cheese. 

Cover with foil and bake for 40 mins, then uncover and bake and bake for a further 25-30 mins or until cooked through. Serve with a crisp green salad.

#WildGarlic #SpringRecipes #Gratin #HotSmokedSalmon
I’ve been a little quiet on here lately. Behind t I’ve been a little quiet on here lately.

Behind the scenes it’s been a full season — family needing me, and a steady stream of celebration cakes keeping the kitchen going. The two together don’t leave much space for anything else.

But March has a way of making you look up. The light is back, British Summer Time is almost here, and nature is doing something rather extraordinary this year — the bluebells are out almost a month early. Beautiful and a little baffling. And the wild garlic is here too, which always feels like a quiet celebration of its own.

Glad to be back. Tell me — what have you been up to?

#CelebrationCakes #WildGarlic #ForagingUK #BluebellSeason 
#BritishSummerTime
A Spanish tortilla of sorts 🍳 Gorgeous rainbow ch A Spanish tortilla of sorts 🍳

Gorgeous rainbow chard and a good grating of hard cheese makes this anything but traditional.

The key is taking your time with the potatoes and onion, frying them low and slow in a generous amount of olive oil for at least 25 minutes before the chard and garlic go in. Don’t rush it.

I used 7 eggs but on reflection 8 or 9 would’ve been better for my pan. 

Perfect for weekend brunch or a proper sit-down lunch, I love it with quick pickled red cabbage and a green salad. Simple, colourful and so good.

#spanishtortilla #tortilla #rainbowchard #hardcheese #weekendeggs
New dates added for April and May. Tap on the link New dates added for April and May. Tap on the link in my profile for more information.

#workshop #buckinghamshire #sourdough baking #learnsomethingnew
I’d almost forgotten how satisfying it is to make I’d almost forgotten how satisfying it is to make your own yogurt. A surplus of milk from the milkman this week gave me just the reason I needed to get back into it.

One of the simplest things to make. All you need is 1 litre of whole milk, (semi-skimmed will work but whole milk gives you a thicker and creamy yogurt) 1 tablespoon of skimmed milk powder, and 2 tablespoons of live yogurt to get things going.

Heat your milk to 85°C, let it cool down to 40-45°C, stir in the yogurt, pour into sterilised jars and keep it at that same temperature if you can for 6-8 hours.

If you’d like Greek style yogurt, just strain through a muslin.

#homemadeyogurt #yogurtmaking #fromscratch #milkman #greekyogurt
Nordic kitchen stories logo

Sign up to receive my latest recipes by email

Copyright © 2026 · Louise Hurst · Privacy Policy · All Rights Reserved · Website by Callia Web